Water
- Water, Fresh and Otherwise
- Moving Water in Camp
- The Kitchen Fort Water System
- 2025 Water Plan
- Gayflower Repair List and Wish List
- Gayflower: Spring 2025 Plan
- Gayflower Leak Prevention
- Gayflower 2.0 Cost Estimates
- 2026 Remount Shower
- Shower Trailer 2026
Water, Fresh and Otherwise
A summary of camp water and plumbing. (Updated post burn 2025)
This template is used to keep a daily log by the water team on playa.
Fresh Water
Usage, 2025:
Kitchen (metered) 493 gallons
Ice machine (metered) 58.2 gallons, note, this was just to fill the ice machine tank when we discovered it was kaput so we made zero ice
Canteen filler / drinking water refills (metered) 524 gallons
Gayflower (inferred): 1215 gallons
Sources:
| Tank | Capacity (gal) |
Refills Available? | Used in 2024 | Used in 2025 |
| Gayflower Tanks | 2310 | No | 1000 for kitchen 454 for showers |
1290 |
| Build Team RV | 176 | Yes | 251 for build RV |
2 refills ordered resulted in about 75 gal remaining |
| SSS Tank | 500 | Yes | 600 for canteens |
Preordered 1 refill 1000 |
| 2305 total 6.2 gal per camper day |
2290 total |
Gayflower Tanks - Details
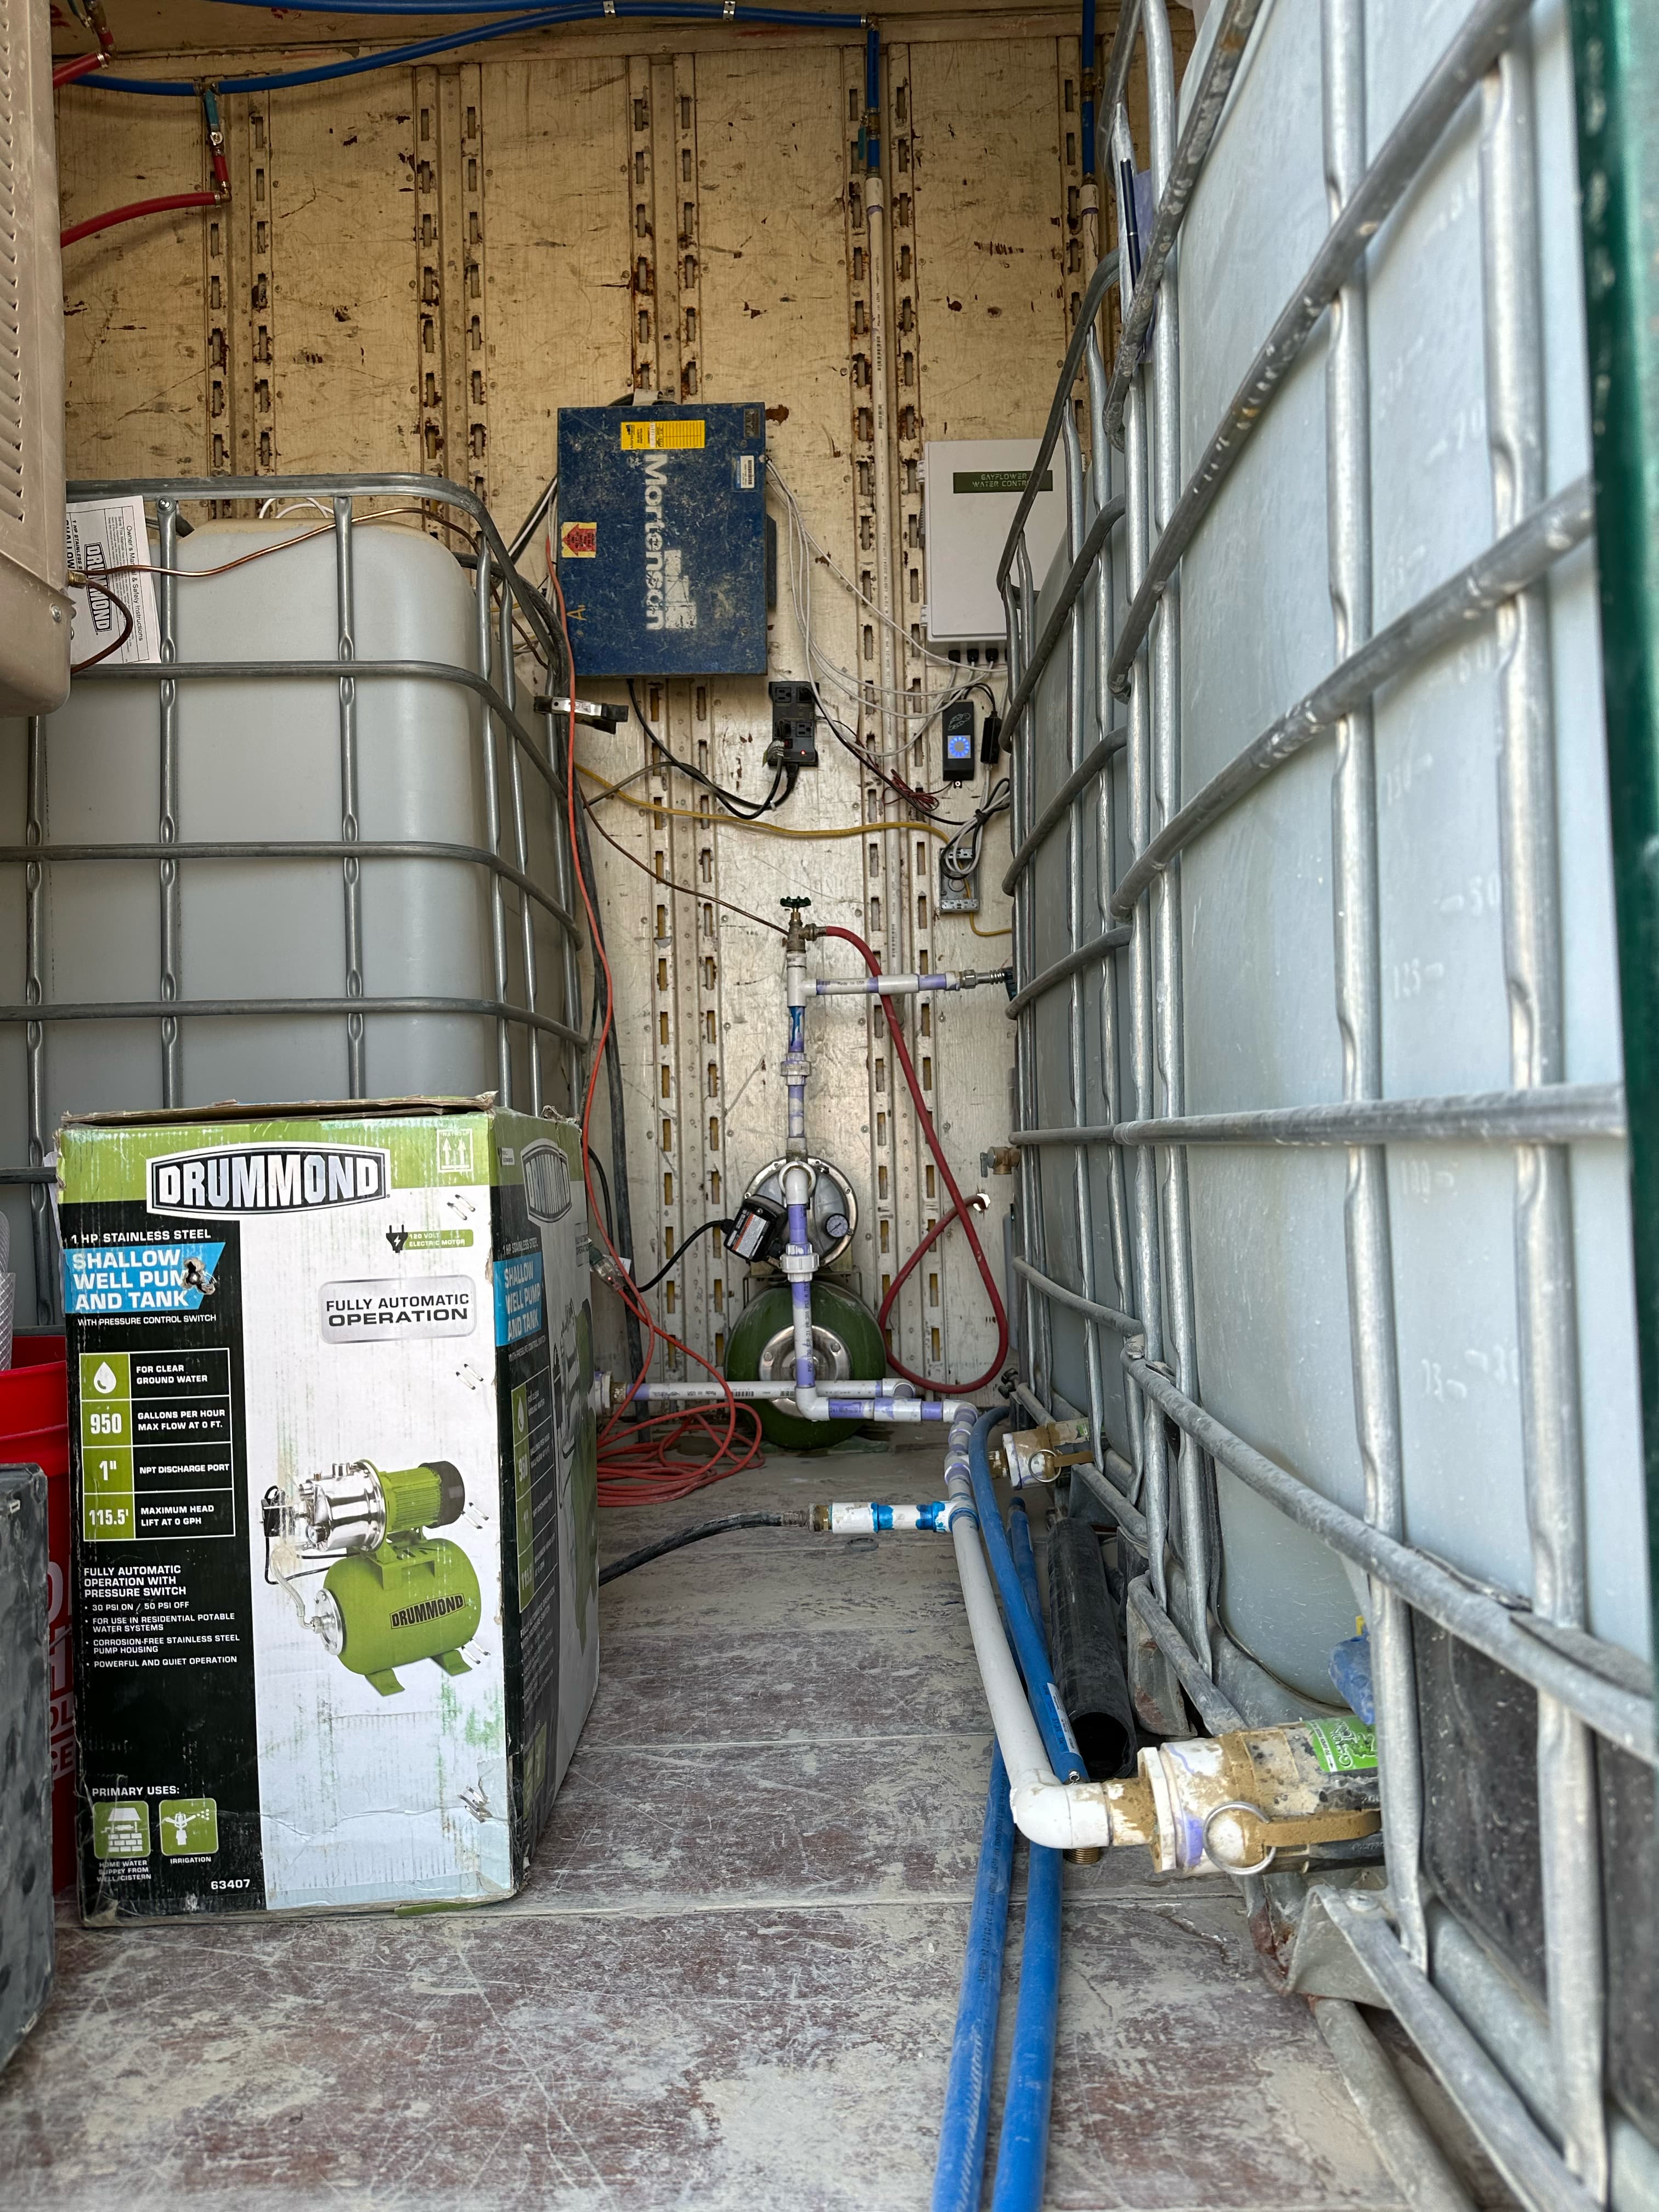
As of 2025 the Gayflower has 7 brand new IBC totes that hold 330 gallons each so we will have a capacity of 2,310 gallons.
The totes are filled in Gerlach for about $0.50 per gallon by Empire Storage and Rental (Andy "Fixxer" Owens) who store the Gayflower.
- Do not use other water sources in the area such as Empire or other wells. They usually have sulphuric water due to the hot springs which doesn't taste great.
The gayflower tanks are directly plumbed to provide showers, toilets, and sinks in the Gayflower, however, there is also an option to hook up hoses. In 2024 we used the bright green hose to fill the tank in the Food Fort.
Build Team RV Fresh Water - Details
The build team RV has a large fresh tank which holds 176 gallons of water.
We usually fill that in Reno at the GSR RV Resort (where we stay for one night before driving in.)
We can also get it refilled on playa by pre-ordering from Sierra Site Services.
SSS Tank - Details
We can rent a 500 gallon tank from Sierra Site Services which comes with a pump and 15' hose. They bring it and fill it up, and they can come back to refill it.
In 2024 this tank was only used for canteen filling.
In 2025 this tank was used for kitchen and canteen filling.
There are other vendors besides Sierra Site Services, but we had terrible experiences with Meco in 2023 and SSS has been absolutely amazing.
Waste Water
"Grey Water" refers to water from sinks and showers which has come in contact with humans and is unsafe to reuse or evaporate. "Black Water" refers to water from toilets which is even worse.
| Tank | Capacity (gal) |
Pumpouts Available? | Used in 2024 (est) | 2025 Plans |
| Gayflower Black Tanks | 1250 | No | 600 | |
| Gayflower Grey Tanks | 1250 | No | 1100 | |
| Build Team RV Black | 100 | Yes (flag a truck) | 150 | |
| Build Team RV Grey | 100 | Can be sump pumped to Gayflower | 200 | |
| SSS Tank | 250 | Yes |
1000 mostly from kitchen and neighbors |
We have preordered 100 gallons in pumpouts |
| 2850 total |
Gayflower Grey and Black Tanks - Details
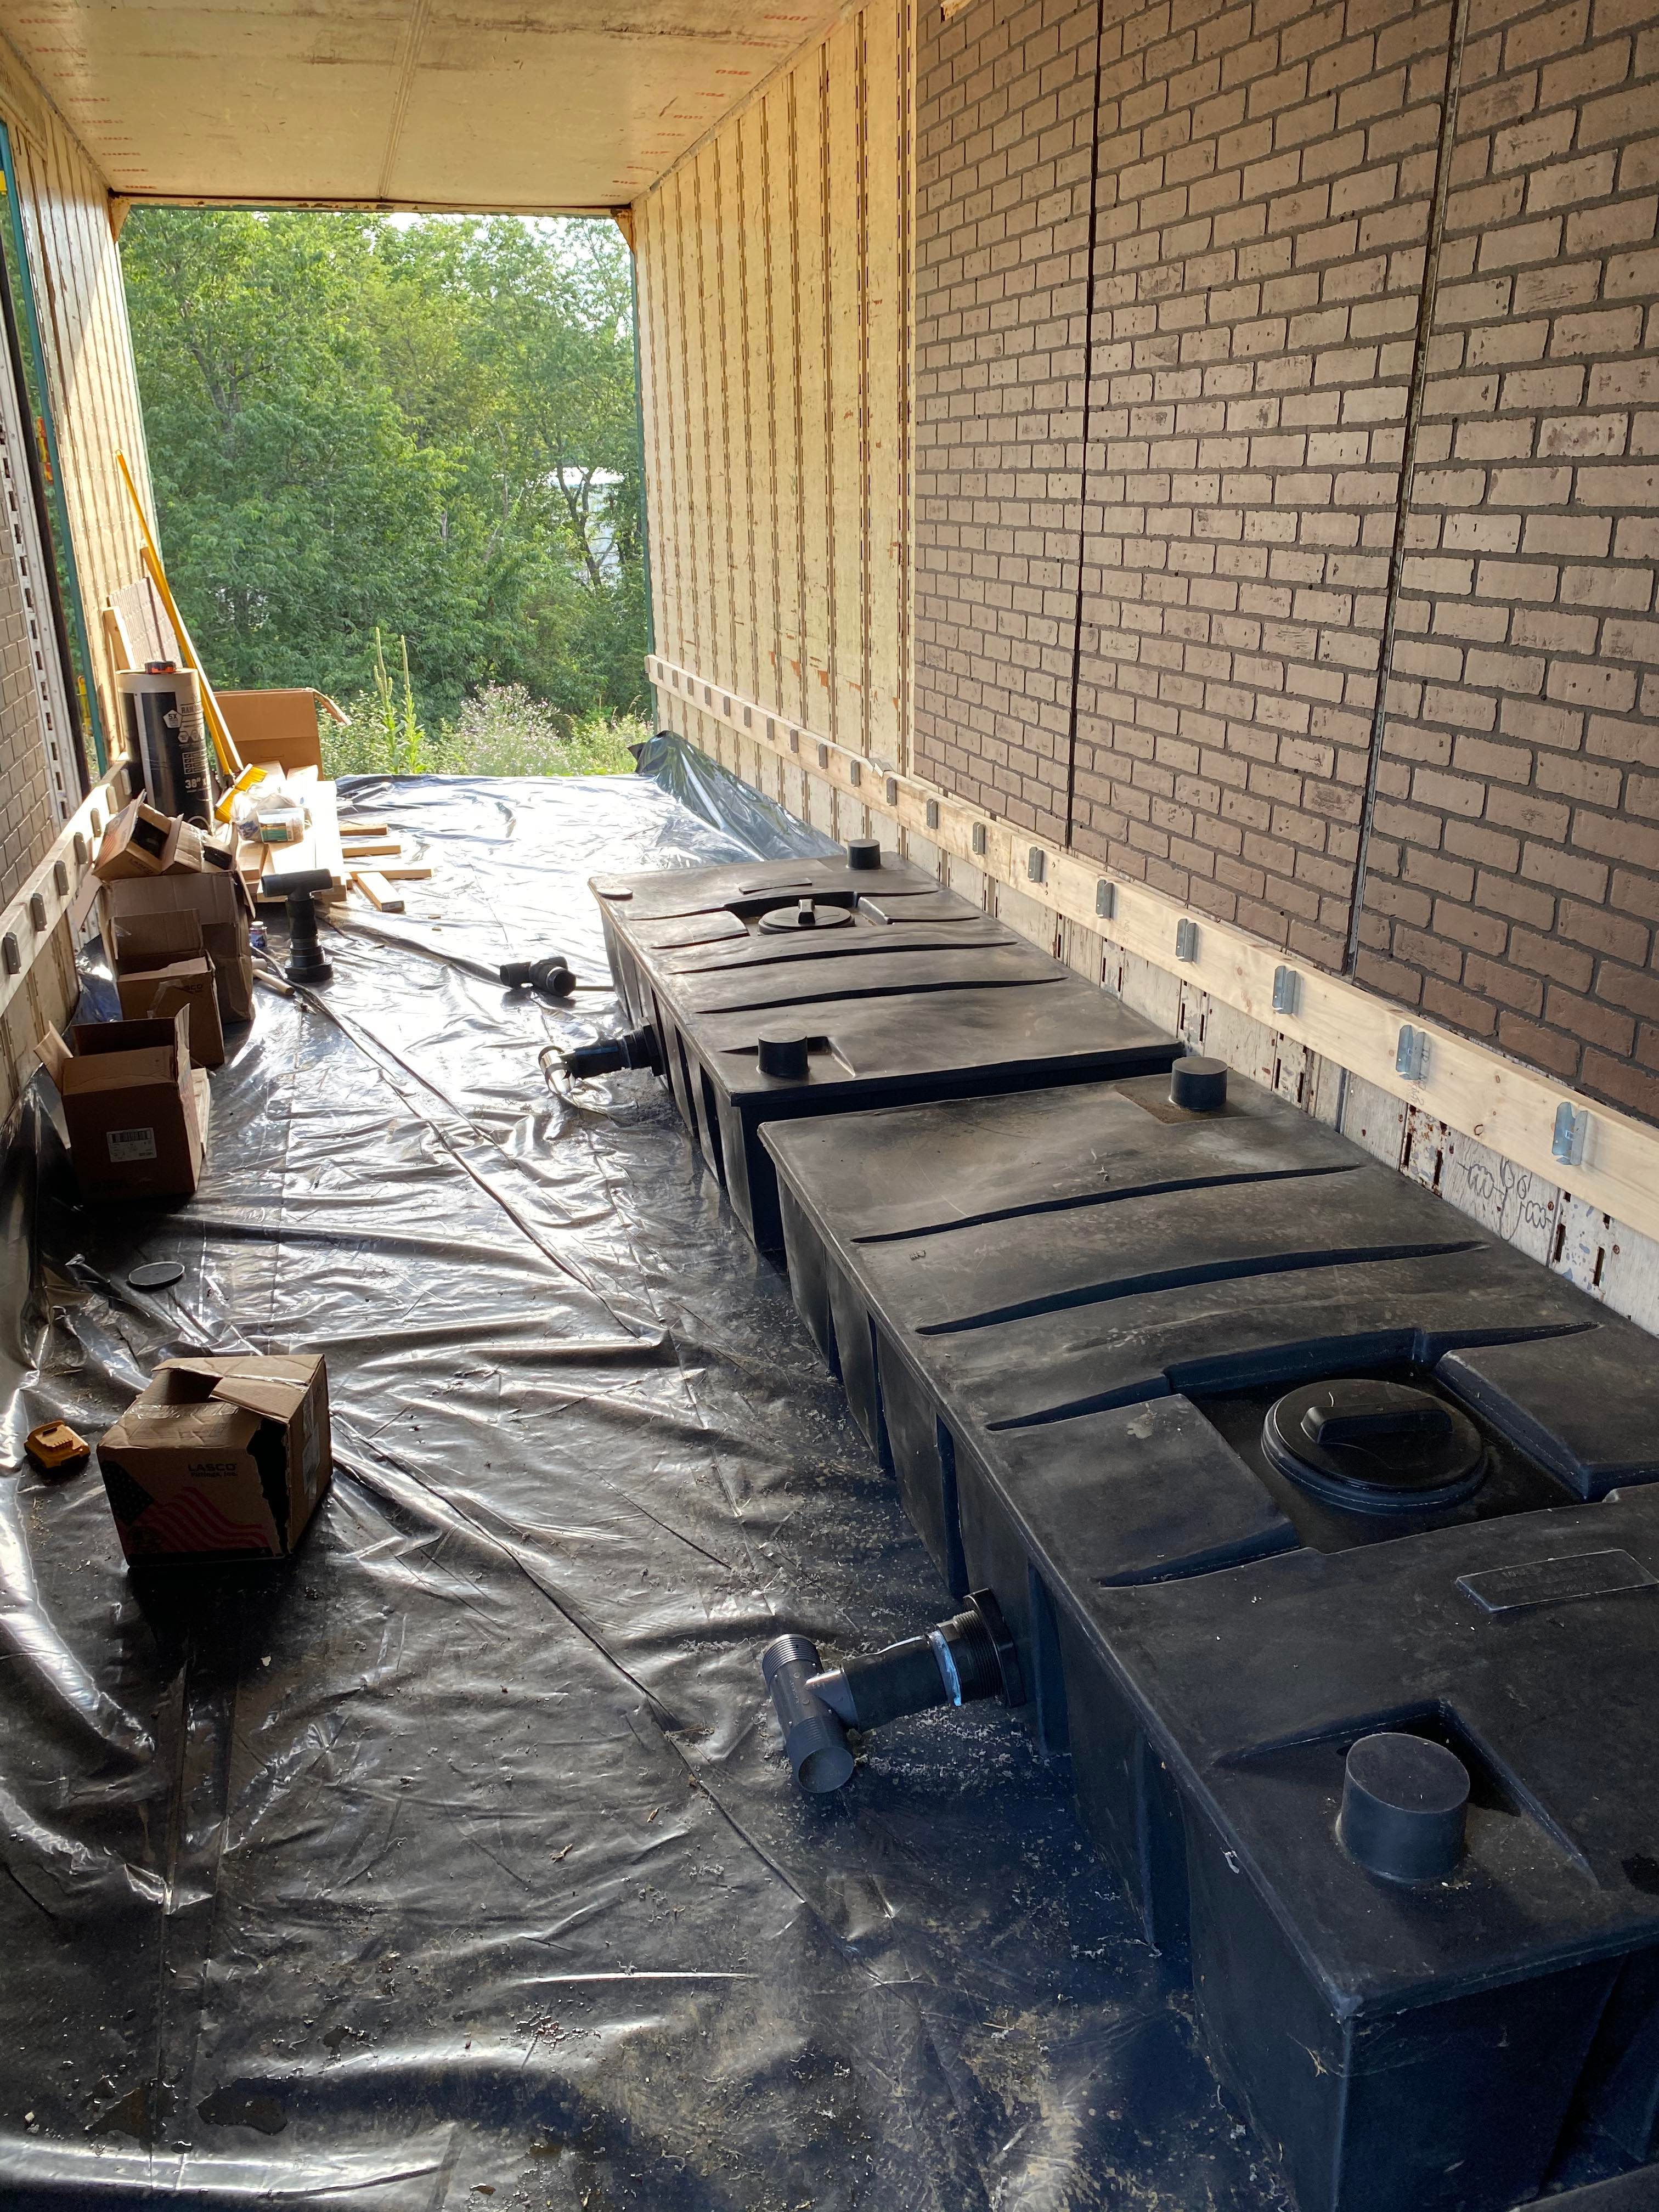
Under the floor of the Gayflower are 10 (ten) 250 gallon tanks. The ones on the driver side are all plumbed together and hold black water from the toilets. The ones on the passenger side are all plumbed together and hold grey water from showers and sinks.
During the week we could use a sump pump or water bug to pump excess grey water from somewhere else (kitchen, RV) into the Gayflower since it has so much capacity. In 2024 we pumped this into the grey water side, but in 2025 we should pump it into the black water side since that side has so much more capacity.
As of 2025 there are water level sensors connected to these tanks so you can read their approximate level. We didn't have any way to test them in advance so we'll see how well they work!
RV Tanks
The Build Team RV has two tanks, probably about 100 gallons each, for grey and black water.
You can theoretically flag down a USS truck at Burning Man which will pump them out for some cash (in 2024 we didn't see many of those trucks)
You can also sump pump excess grey water to the Gayflower.
After the burn you can dump them at the GSR in Reno (if we're staying there), the TA Travel Center in Sparks, or at the Loves in Fernley.
SSS Grey Water Tank - Details
We can rent a 250 gallon grey water tank from SSS which is a low cube. They will come and pump this out during the week (if paid in advance).
In 2024 was used primarily for the kitchen, but some neighboring camps who had not made arrangements for grey water also dumped their grey water in there. We filled it 4 times.
In 2025 it will again be used exclusively for the kitchen.
Vendors
Sierra Site Services
Office: 888-458-8777
Mobile: 530-957-5049
Contact there is Michelle Haley <michelle@sierrasiteservices.com> and they have an office on playa.
Moving Water in Camp
Every year we've been getting better and better at figuring out how to easily move water, clean and dirty, around in the camp.
Fresh Water Well Pumps
We have two Harbor Freight 1HP Well Pumps. (Manual) - the main one keeps the fresh water system in the Gayflower pressurized, and there is also a backup if something happens to that one. When we rent a fresh water tank from Sierra Site Services they also provide this exact same pump.
These pumps seem to work really well, and they have their own bladder so that the pump doesn't have to flip on and off frequently. Basically, they will maintain pressure in a pressurized water system, like the water supply in the Gayflower or the Kitchen Fort, or even when attached to a hose.

Pro Tip: When delivered, our pump was not primed. To prime it, you have to open a little nut and pour in some water until it overflows. We did this using a plastic bag with the corner cut off.
Pro Tip: Do not run this kind of pump dry for more than 10 seconds.
Pro Tip: The tank must be pressurized to 23 psi which can be done with a bicycle pump.
Pro Tip: Use backflow preventers both before and after the pump so that the pump stays primed.
NEVER use this tank for anything other than potable water.
Sewer Pumps
We bought two of the Harbor Freight 3/4 HP Submersible Sump Pumps (Manual)
 These were intended to move grey water around camp quickly, say, from the kitchen to the gayflower. They pump water into a thick red 2" hose that looks like this:
 We have about 50' of this hose.
There are two problems with this method of pumping grey water. The first is that the sump pump is meant to sit in a bucket that fills up with grey water causing the ball to float which turns on the pump. That means it never pumps the bottom n inches of water which can be a lot depending on the size of the bucket you put it in. The second is that those 2" hoses fill up with grey water and once the bucket is empty, they stay filled up with grey water... there is no way to cause the pump to push out the remaining contents all the way to wherever you're going. This means there is a manual step, after pumping grey water, involving walking the red hose from the source to the destination to gravity-force out all the water.
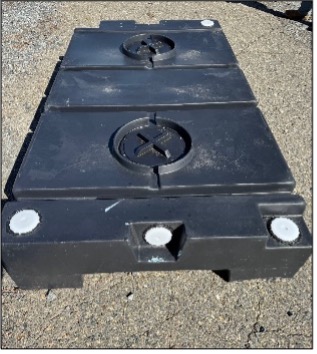
The grey water tank provided by Sierra is low-slung and looks like this:
 With this tank, it's not a big problem to hand-caress the grey water from the hose into the tank. However, if you are trying to move grey water up to the Gayflower, where the tanks are probably 5' off the ground, it's not so easy.
For the last mile, we have these little Water Bug Style Pumps:

That can be completely submersed in water and it will suck up virtually everything and pump it up through a narrow hose, which gets the last little bits of water up and out. It's slow, though, compared to the big sewer pumps.
New For 2025, we bought a new Milwaukee cordless pump:
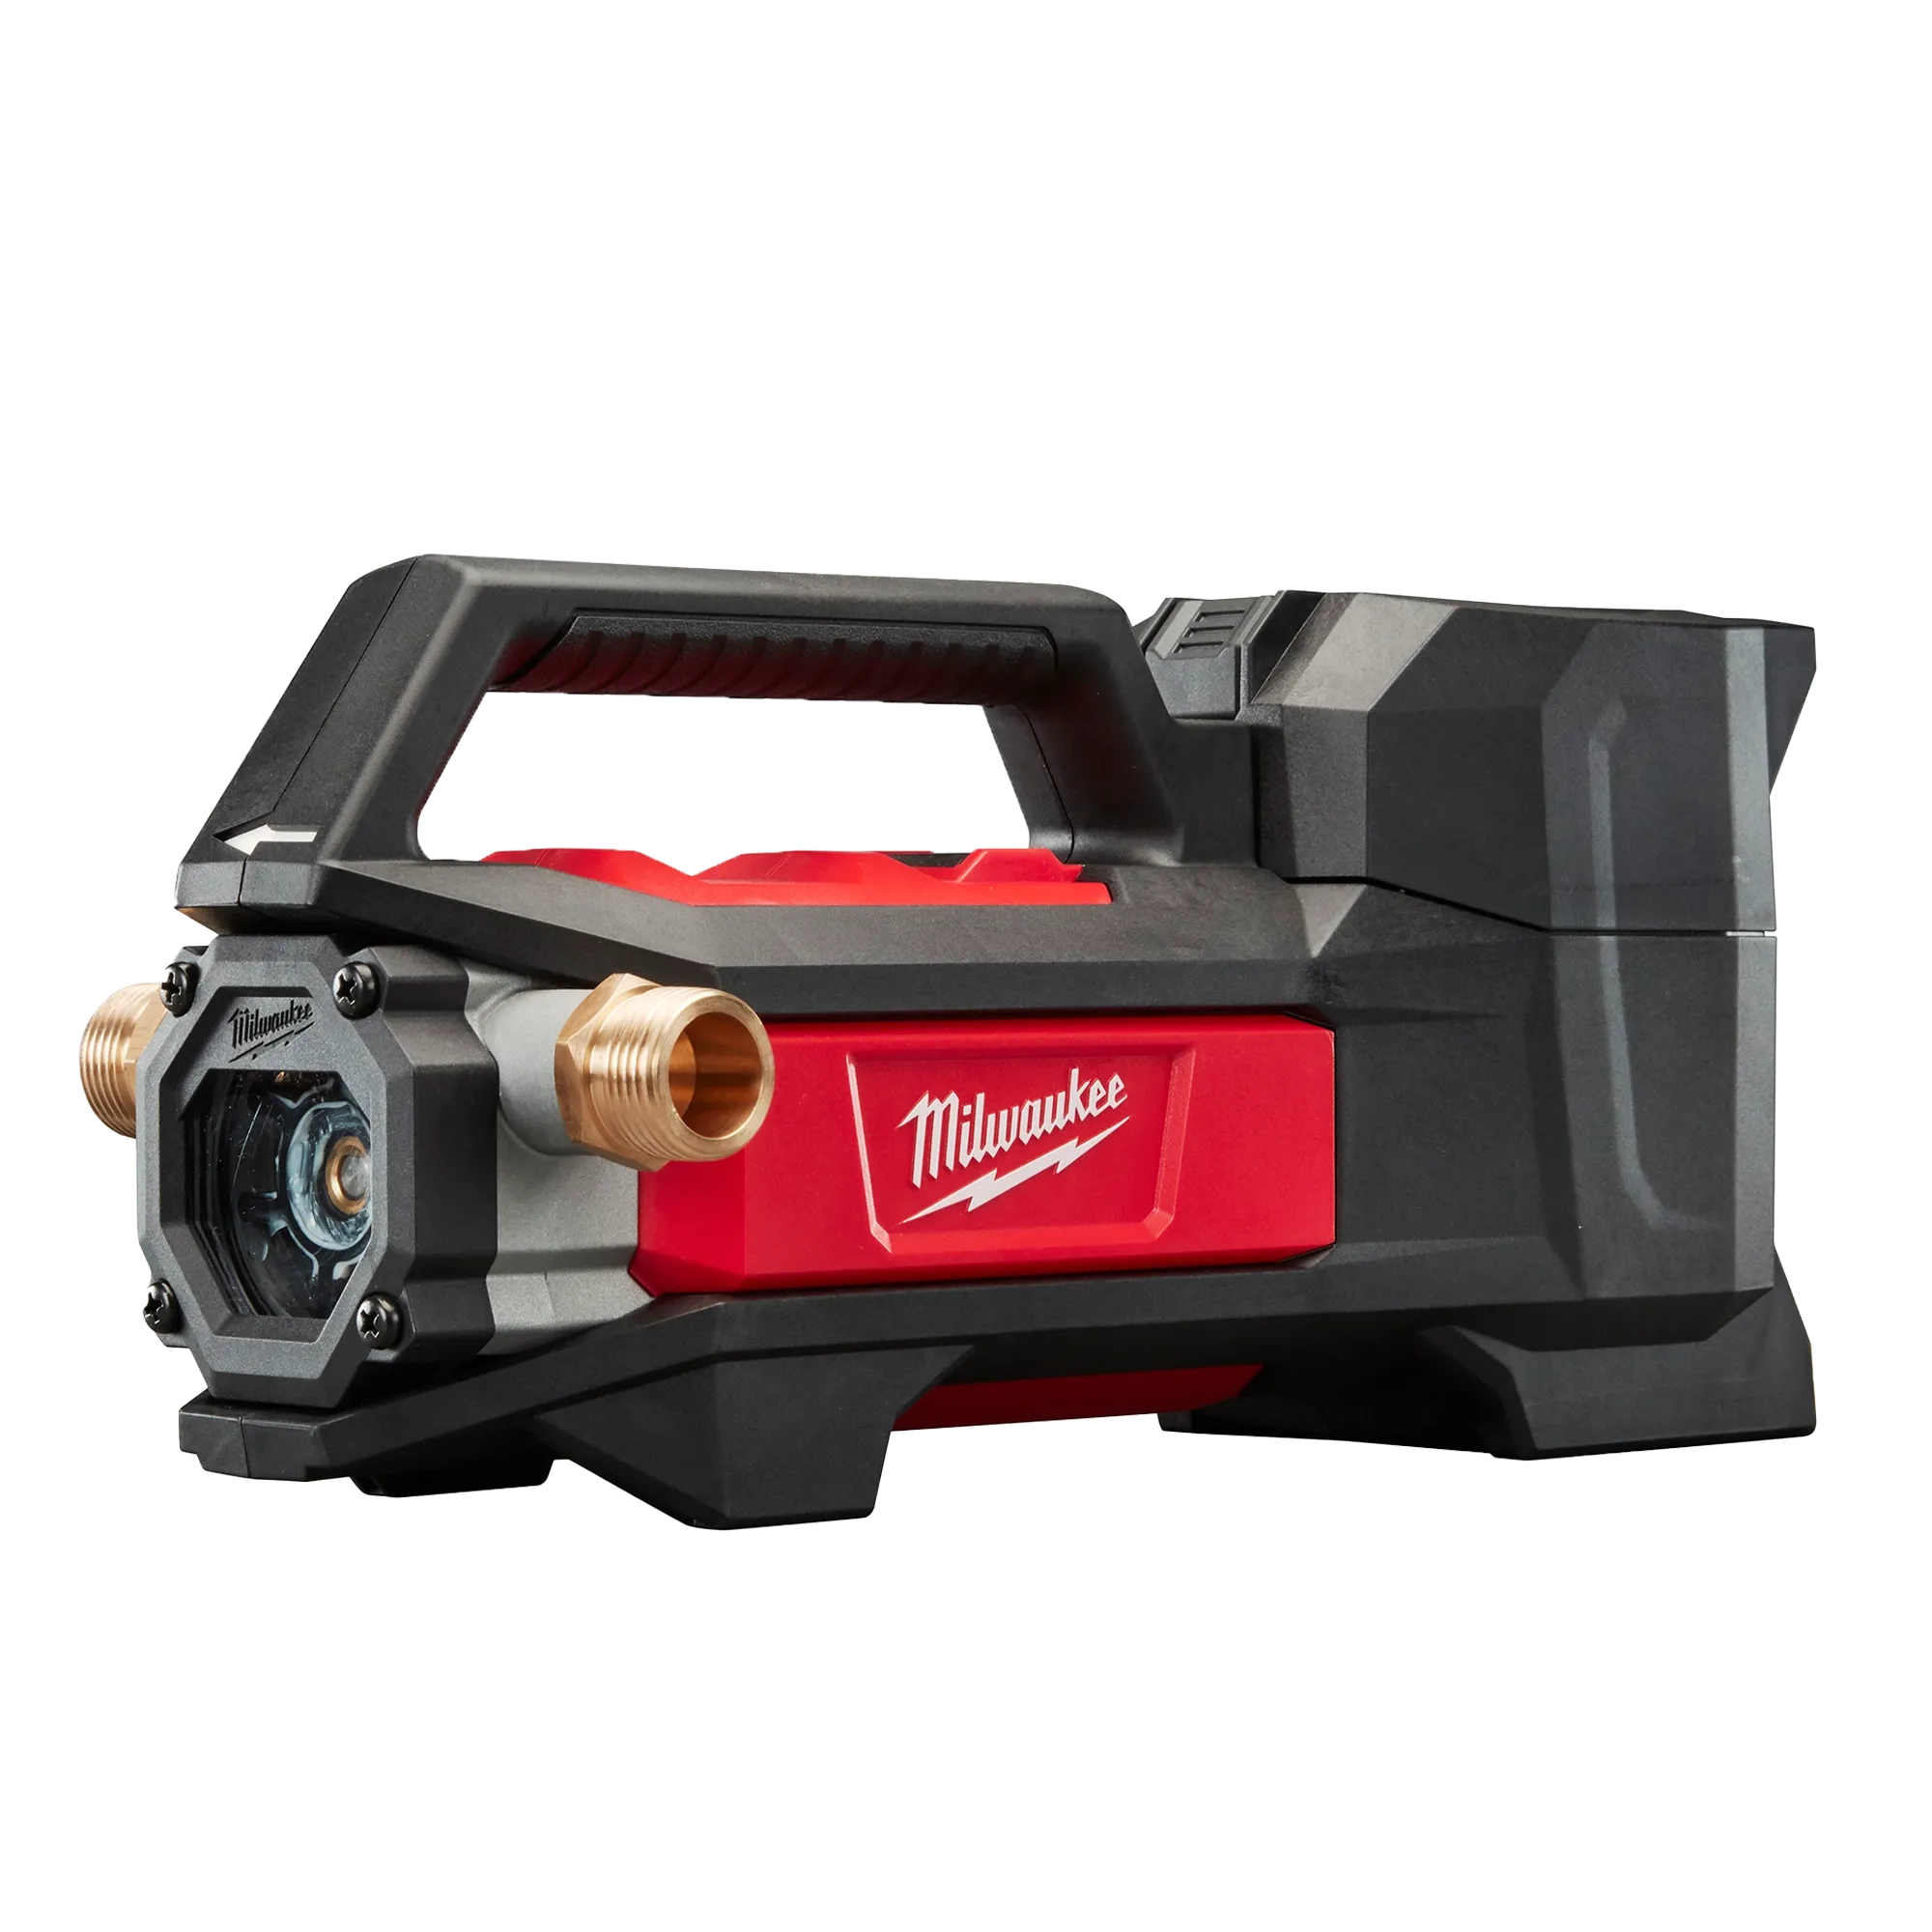
This is a hand-sized pump that runs off the same chargers and batteries as our impact drivers. It uses garden hose fittings. We used this in 2025 to pump grey water from the food fort to the SSS grey water tank whenever the food fort fills up and it worked really well! Because it was so portable it was easy to move it to the Gayflower and move some grey water there, too.
The Kitchen Fort Water System
The kitchen fort, delivered in 2023, is a marvel in camp automation, allowing us to bring a commercial-quality working kitchen to playa and start using it without any setup. However, we're still learning about the best way to hook it up to water.
Fresh Water
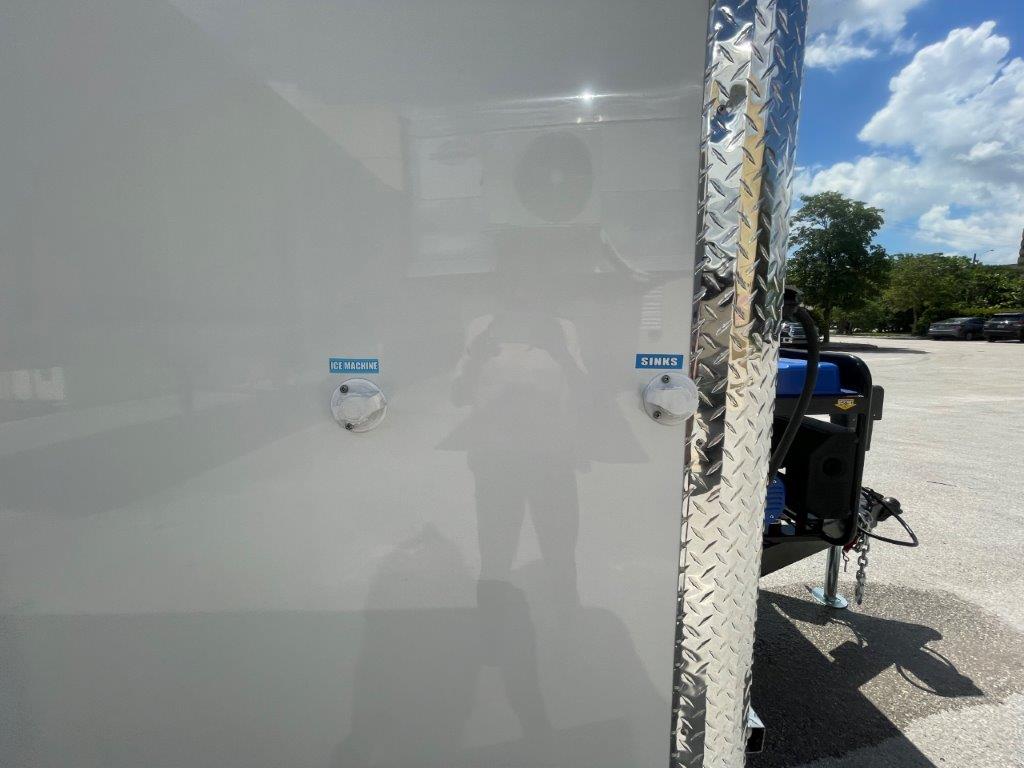
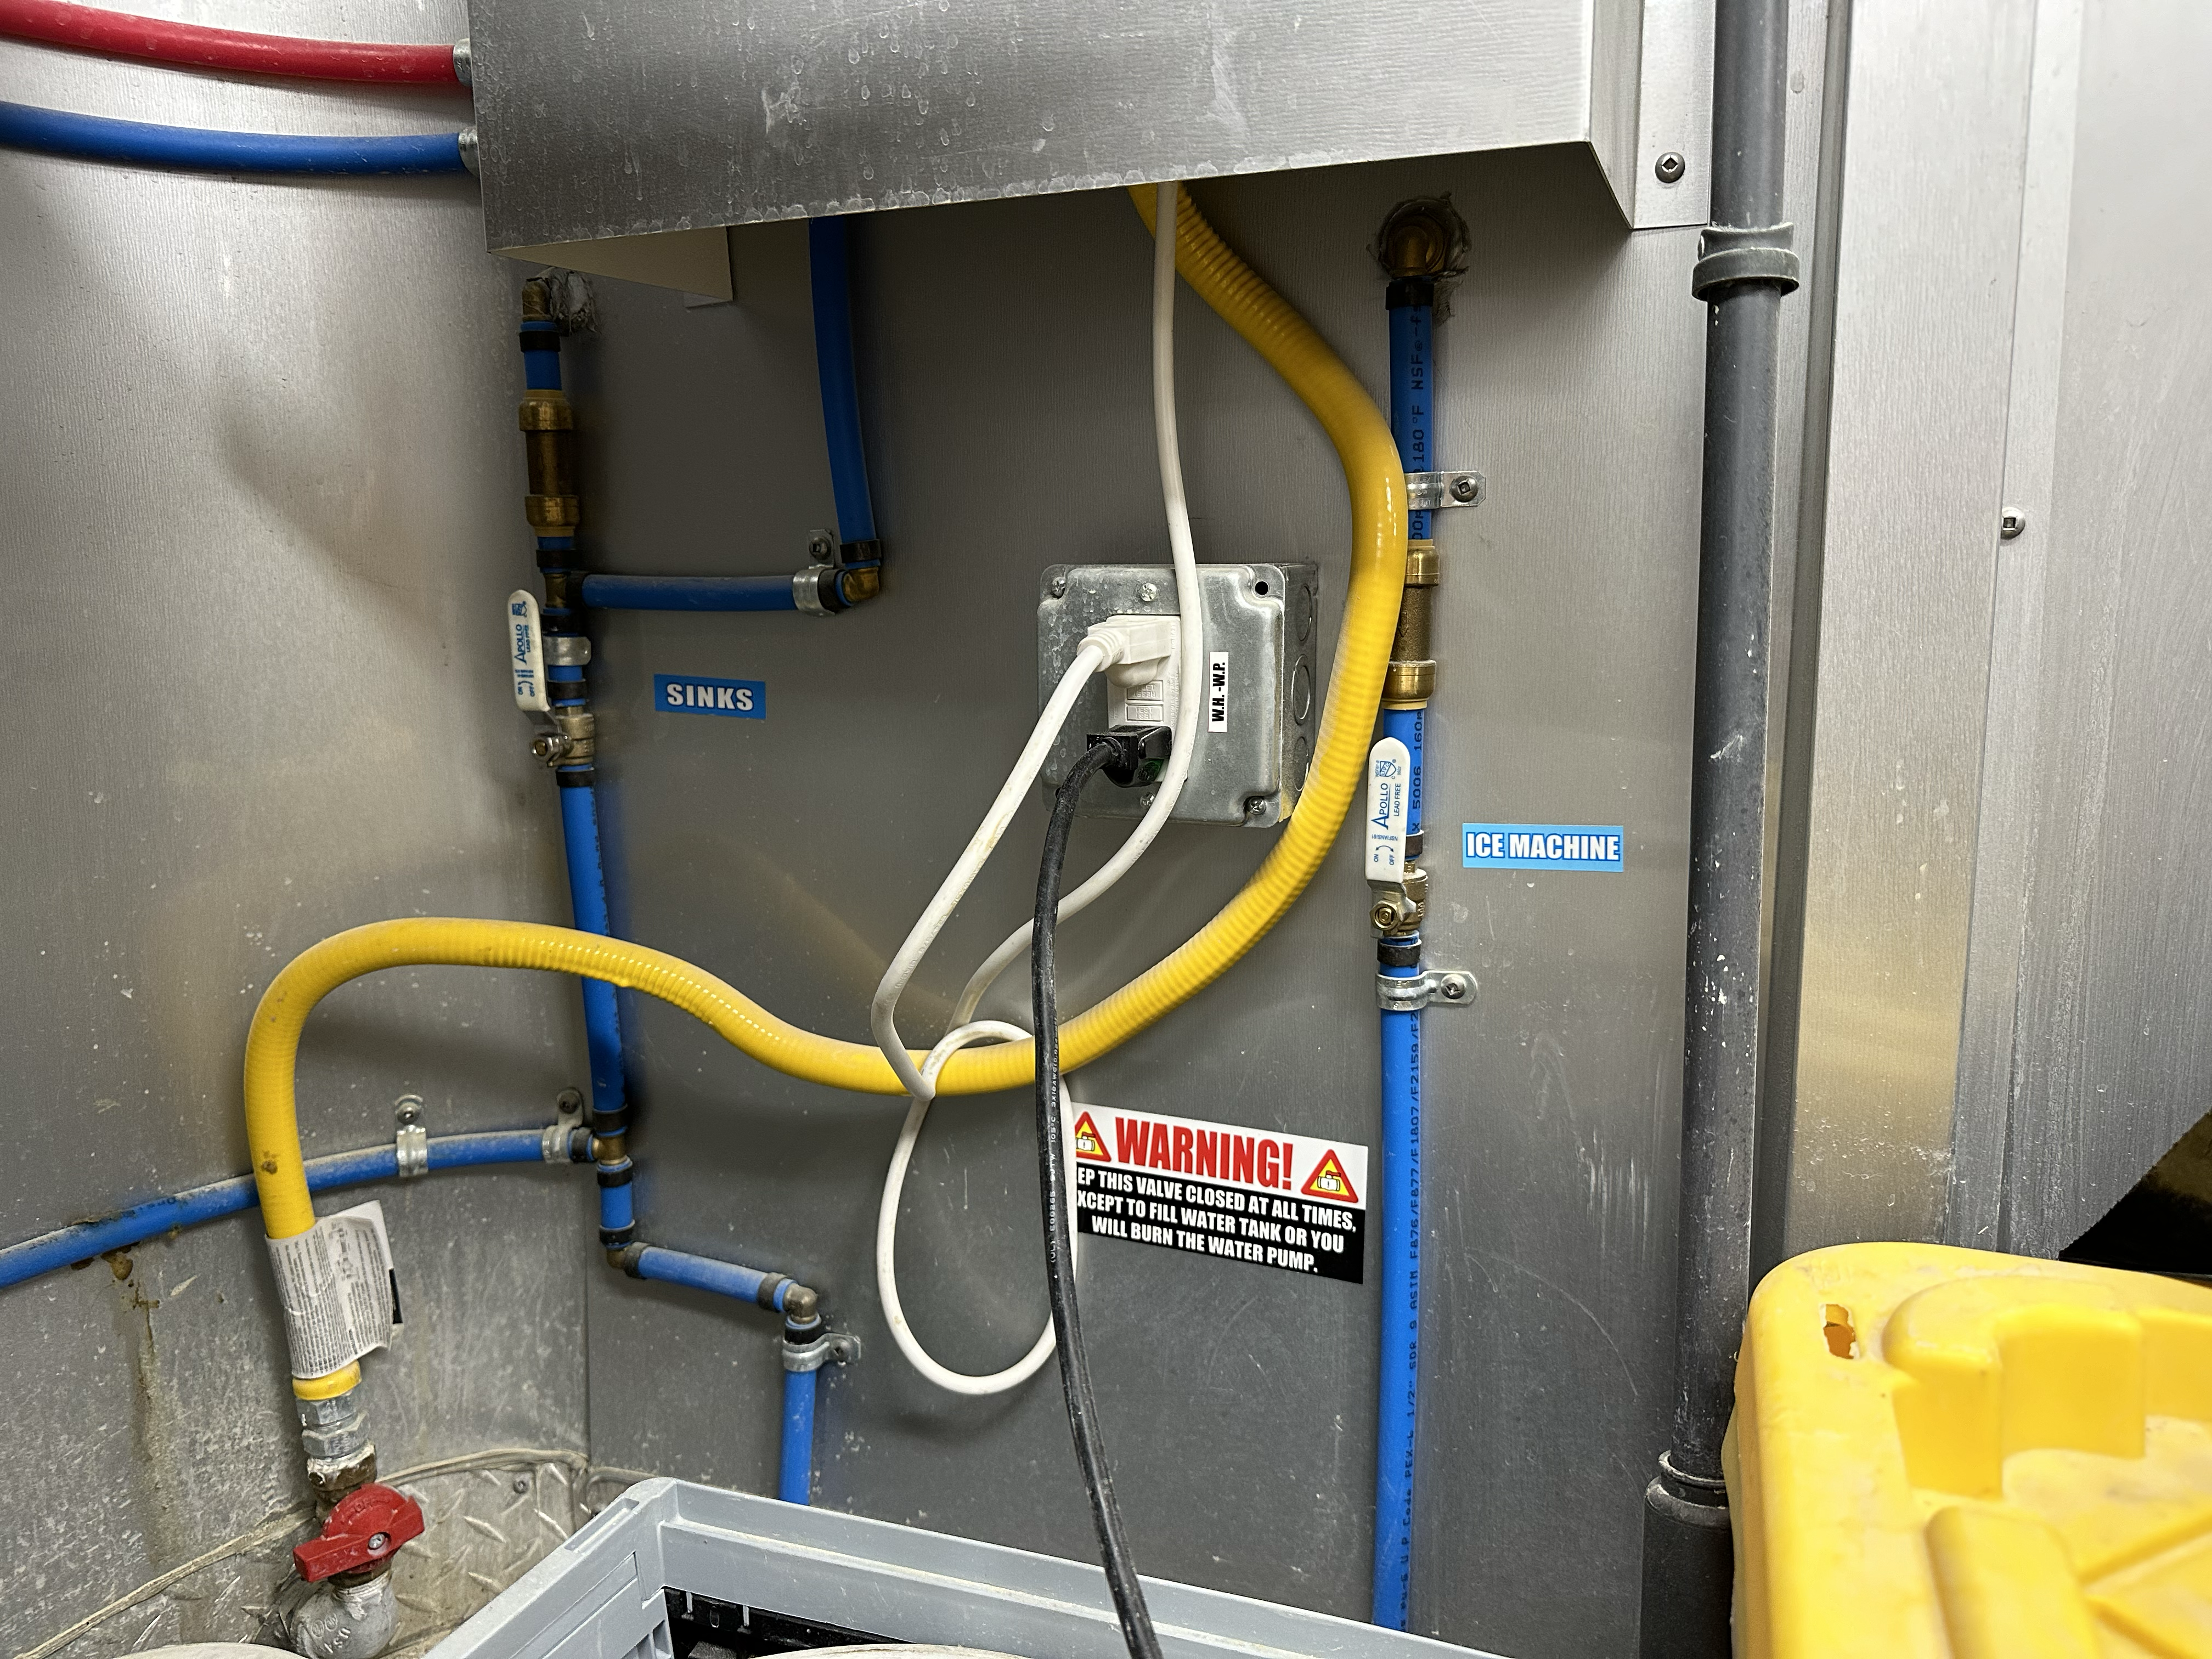
There are two separately plumbed fresh water systems: one for sinks and one for the ice maker. The inlet for each of these systems is on the passenger side, front. They are 3/4" hose inlets:
Each system is laid out like this:

Each one has:
- a hose attachment outside for connecting water to the system
- two tanks, per system, under the bottom of the trailer to store water.
These tanks have an opening at the top, allowing air in and out so they can fill and empty. This opening also means that if you overfill them with a hose, the excess water just starts to pour out onto the ground without warning.
- a little Shur-Flo pump inside the trailer that can pump water up from the tanks to pressurize the system
- a shut off valve inside the trailer that connects or disconnects the tanks and pump. Here's what the shut off valves look like:
Running the system off tanks
In 2023/24 we ran the food fort by filling its tanks. Here's how that works:
- Open the valve inside
- Connect the hose, outside
- Turn on the hose until the tank is full
- Remove the hose
- Close the valve inside
- The pump will pump water up from the tank into the food fort system
You need to do this for both the sinks and the ice maker, separately.
We thought this was a nice idea because it got the water team involved every once in a while and avoided the risk of the kitchen using up all of our camp water by mistake. In reality someone had to fill the tanks once or twice per day, and in particular the ice machine's running out of water probably caused it to dump the water it had instead of just producing a lot of ice.
Running the system without tanks
In 2025 we are going to try to run the system without using its tanks. Here's how that should work:
- Close the valves inside
- Unplug the pump(s)
- Connect the hose, outside
- Turn on the hose outside
- The external water pressure should provide water inside the food fort.
The way we'll set this up:
- The SSS 500 gallon tank will be set up right next to the food ford. It has a pump and a 15' hose.
- from the output of that hose, supplied by SSS, we'll connect
- to a hose splitter with shutoff valves
- to two smaller hoses
- each of those hoses goes through a check valve (to prevent backwash)
- and also through a water meter (so we can monitor usage)
- to the two hose inlets (one for ice and one for fresh water) on the side of the food fort.
Ice Maker
The ice maker system is just like the fresh water system, with its own tanks and pump and shut off valve. In 2023 and 2024 we were underwhelmed by the amount of ice this system could produce (it was nothing close to what it should have been able to produce based on specs) and overwhelmed by the amount of clean but undrinkable water that it dumped on the ground through an open spout under the trailer as a part of it's too-frequent "clean" cycle. In 2025 we want to give it one last chance by keeping it connected to pressurized water so it never runs out of water to see what it can produce.
2025 Spoiler Alert. One thing we found was that the Ice Maker does not actually have a shut-off valve to bypass the tank. The Ice Maker must use the 50 gallon tank. Another thing we learned is that the Ice Maker was damaged probably due to not being properly winterized, and, for all intents and purposes, is no longer useful
Grey Water
There are grey water tanks under the kitchen which fill up about once a day. In. 2024, we pumped this water across about 100' to a grey water tank supplied by SSS.
The waste spout of these tanks is a 1.5" ID threaded outlet. It is probably about 9" above the ground.
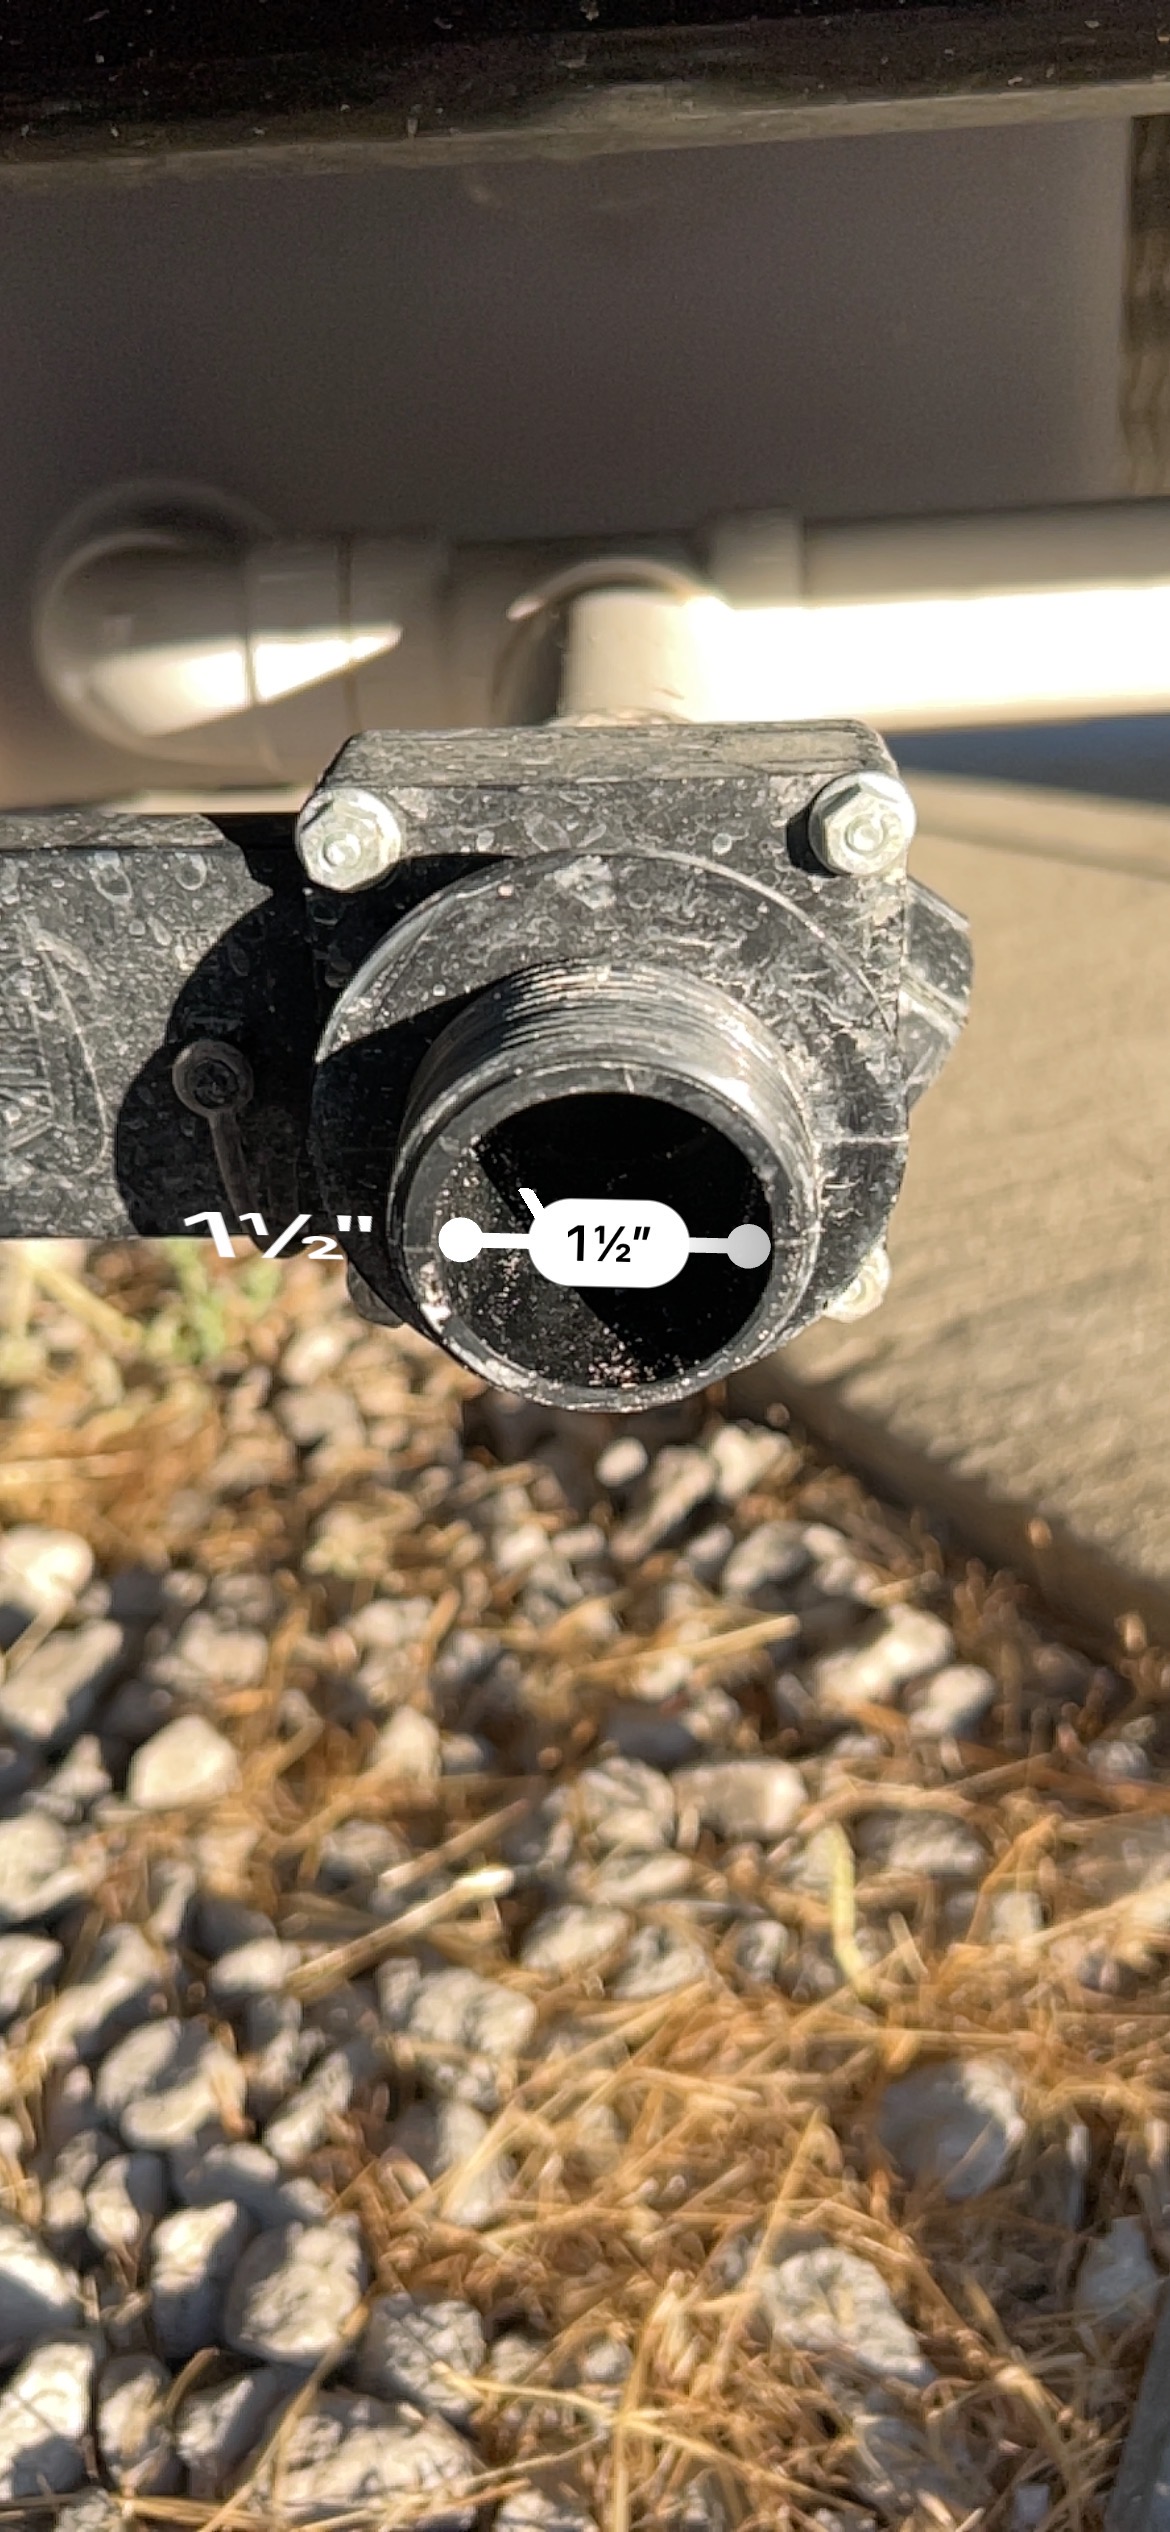
For 2025 the official plan will be to put the SSS tank right next to the kitchen, and it will be exclusively used for kitchen grey water. The SSS tank is about 17½" high with input from the top:
To pump the water from the Food Fort tanks to the SSS tank, we connect a Valterra T01-0094VP or Valterra T01-0091VP to the 1.5" outlet, and then from there a small length of garden hose, to a transfer pump that can pump the grey water up to the SSS tank on demand. We use a Milwaukee cordless transfer pump which runs on the same batteries as our impact drivers; with that connected it takes about 10 minutes to completely empty the food fort.
2025 Water Plan
This is the 2025 water plan.
Camp Layout
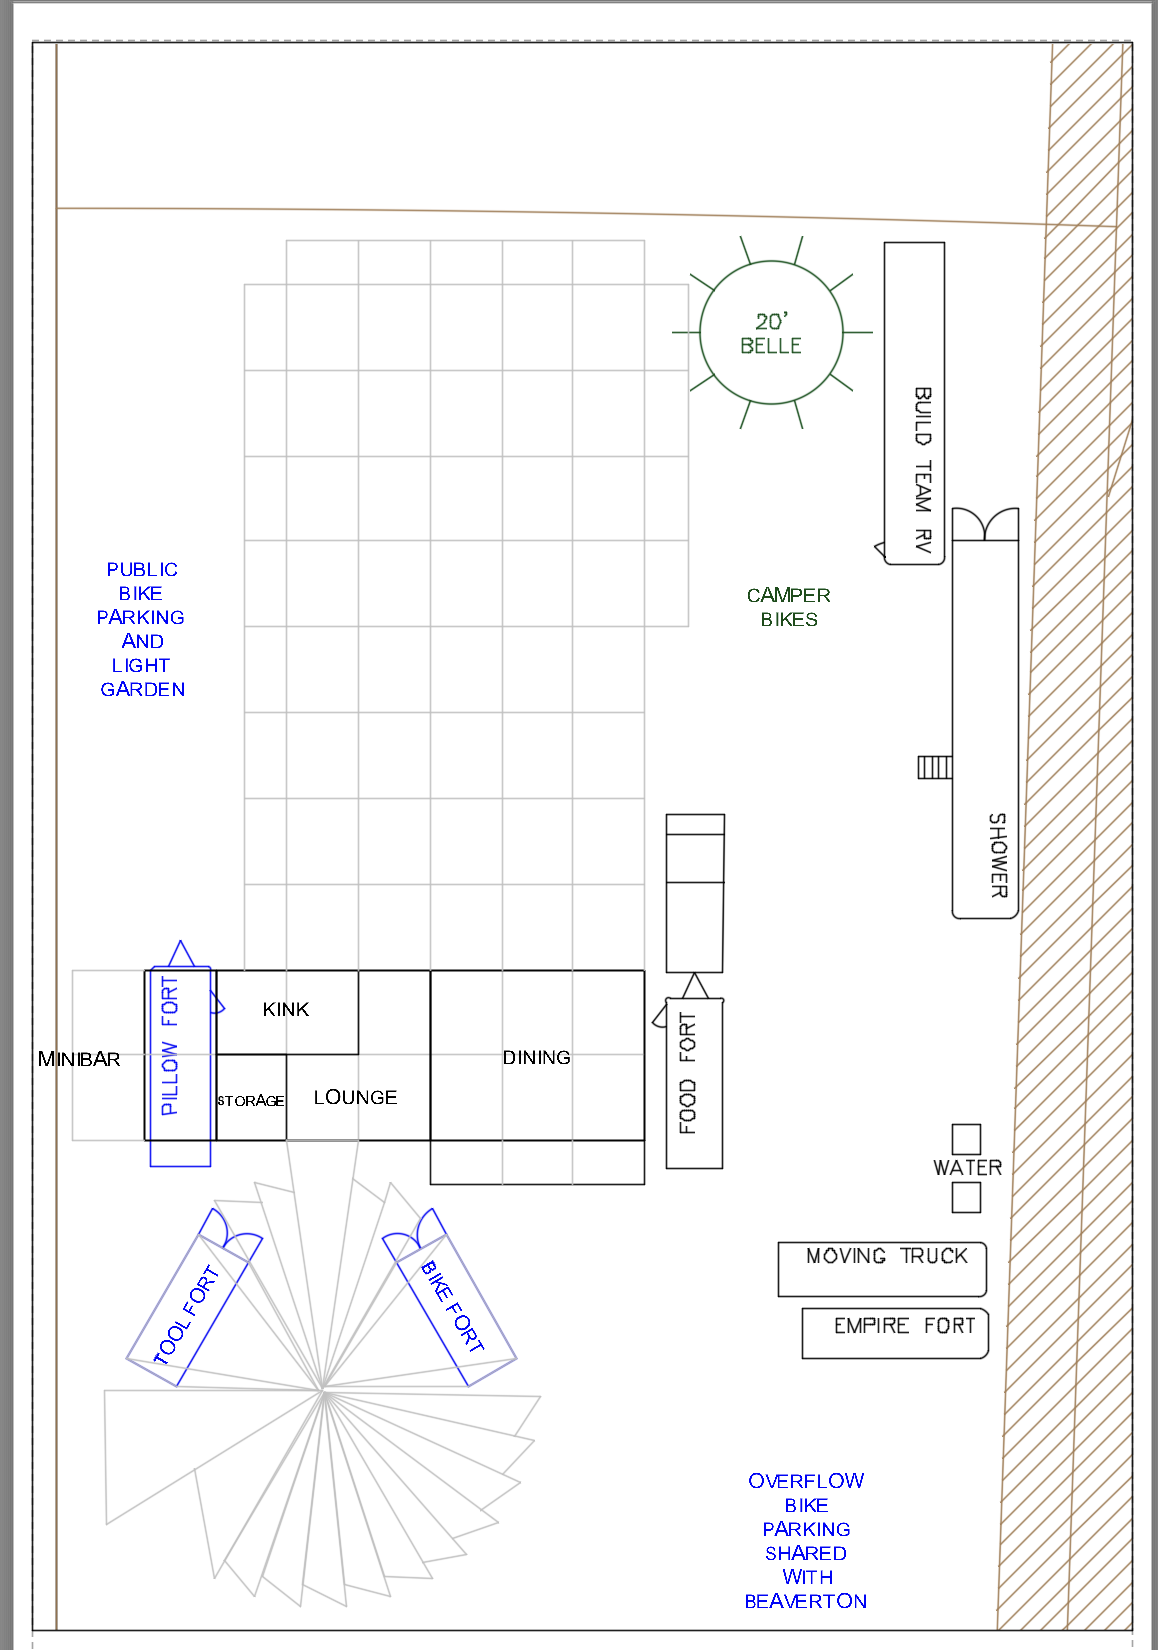 This year's layout places the Food Fort much closer to the Gayflower, and with its inlets and outlets facing the fire lane. That means pumping between those two locations is closer and Sierra Site Services ("SSS") can easily service everything if needed.
Food Fort
Read more details on the Food Fort plumbing
Fresh Water
For the Food Fort we expect to use 1000 gallons, same as last year. To make this easy, we'll rent a 500 gallon tank from SSS that will be dedicated to the food fort. We will schedule a single refill of this tank on Wed Aug 27.
- If the tank is used up before the refill arrives:
- We'll warn the food team that they are using too much water
- We'll provide some temporary water using a hose from the Gayflower to top off the SSS water tank
- If the tank still has water in it on the day when the refill is scheduled:
- We'll fill up the Food Fort tanks before refilling, so as to make sure we get all 500 gallons that we paid for
Plumbing:
- From the water tank by the fire lane
- via it's pump
- via a hose over to the food fort
- to a three way splitter
- One goes to the Food Fort Sink Inlet (we have short hoses, 1'-2', ideal for this)
- One goes to the Food Fort Ice Inlet (we have short hoses, 1'-2', ideal for this)
- One goes to a canteen filling station (via filter) which we set up in the dining room
- ALL THREE outputs here have INDIVIDUAL water meters so we can track usage.
RV
We scheduled RV water refill for August 22 and 27.
Grey Water
We also expect to generate 1000 gallons of grey water from the Food Fort. We'll rent a 250 gallon tank from SSS and put it right next to the Food Fort. We'll schedule three pumps of this tank (750 gallons) during the week, on Mon, Wed, and Fri, and we can also leave it full.
During the week, grey water from the food fort will accumulate in its internal tank which holds 104 gallons. On a regular basis, we will use a portable pump to empty that into the SSS tank.
Plumbing:
- From the grey water tank under the food fort
- via a Valterra 1-1/2” FPT x ¾” MGHT adapter
- and a short hose
- to the new Milwaukee rechargeable grey water pump
- all of the above mess is placed in a cement-mixing bin to contain any mess
- and then a long hose
- over to the SSS grey water tanks.
The pump needs to be manually activated to dump the tanks every day.
The ice maker dumps a bunch of semi-clean water out the bottom, too. This does not go into any kind of tank. We have to put a large concrete mixing tub under there to catch this water and regularly pump it out to the SSS tank.
- We can place a water bug in this mixing tub and pump it to the SSS tank. With a little creativity we should be able to use the same hose as we use for the grey water.
The goal is to get the SSS tank as full as possible by the time they come to pump it out, so as to take advantage of all 250 gallons pumping that we paid for.
Daily Routine:
- check available space in SSS tank
- if room available, pump ice water into it
- if room still available, pump grey water into it
- is the SSS tank full and the food fort threatening to be full? Organize a pump operation all the way to the Gayflower Black tanks.
Gayflower
The Gayflower will come with over 2000 gallons of fresh water which should be enough for showers, toilets, drinking water (canteens), and as emergency backup for food.
It can accommodate 1250 gallons of grey water and 1250 gallons of black water. Last year the grey water tanks were much fuller than the black water tanks. So if we ever have to pump excess grey water from the RV or food fort into the Gayflower, we should pump it into the black water tanks.
We can set up a hose from the Gayflower to provide fresh water for drinking, which can go through a water filter.
Our initial plan will be to use SSS water for canteen filling, because it's better located near the food fort.
2026 And Beyond
- Ultimately I'd like to get the SSS usage down to zero and rely solely on the Gayflower. It's way cheaper that way.
Gayflower Repair List and Wish List
Introduction
The Gayflower is an absolute marvel, but it is not particularly robust or fancy. So we always have a ton of improvements we'd like to make to get it better and better! This chart summarizes those plans.
| Priority |
Project |
Status |
| DONE | Fix Leaks Around Fresh Water Pump The main green fresh water pump has a few little drips. There is a second leak on the thin brass fitting where water goes off to the swamp cooler. |
|
| DONE | Replace IBC Totes With New The four IBC totes in the back were used for fruit juice concentrate and cause the water to smell poorly. One of the three IBC totes in the front (the rearmost one) has a broken shutoff valve. |
COMPLETED spring 2025 |
| DONE |
Seal Waste Line at Second Urinal We haven't been able to use the second urinal because the waste line leaks. |
COMPLETED spring 2025 |
| DONE |
Leaks around sink bases |
COMPLETED Fall 2025 |
| DONE |
Leak in Grey Water Connecting Hoses |
Completed Summer 2025 |
| Not Needed |
Better Support For IBC Totes in Back |
The wood that is there appears to be adequate |
| 5 URGENT |
Secondary Containment for Grey / Black Water Tanks |
First attempt of adding more pond liner in back did not help. Currently we don't have any idea for what to do about this |
| DONE |
Level Indicators for Waste Water Tanks |
COMPLETED spring 2025 |
| DONE |
Main faucets broken cheap old faucets broke. Replace |
Replaced by Adam Pence (Summer 2025) |
| DONE |
Shower heads clogged and corroded beyond repair |
Replaced by Adam Pence (Summer 2025) |
| 5 Urgent |
System for easy winterization |
We were able to winterize during strike 2025 using the connectors we bought and the RV air hose. Adam Pence also disconnected a lot of things like the backs of the toilets October 2025 |
| 2 Low Pri |
Repair Hand Wash SInks Both of these were damaged around the foot pump by freezing. |
People barely used this IIRC Might be easy just to swap out the foot pumps, though. |
| DONE |
Light in back room |
Done by Adam Pence (Summer 2025) |
Post 2025 Event List
| Priority |
Project |
Status |
| 5 Urgent | Remount Shower Shower plumbing has fallen from the ceiling |
removed |
| 5 Urgent | Repair Waterless Urinal One of these waterless urinals is still not draining properly |
After investigation it became clear that the waste line is misrouted underneath the floor such that it bumps up rather than sloping purely downhill. This might be correctable by shortening the length of the pipe coming down from the urinal by 6", but the real fix would be to climb underneath to reroute it. |
| 5 Urgent | Replace shower water supply The current galvanized metal pipes being used to provide water to the showers will always corrode. The corroded material will clog the showers time and time again. Probably should replace with PVC |
Plan for fall 2025 |
| 5 Urgent |
Investigate dumping situation Need to discuss with fixxer. What do we need to do to make it easier to dump and clean the black tanks? |
Tanks can only be emptied about 75% and there is no provision for rinsing. |
| 5 Urgent |
Rear left door to van can't be closed without a crowbar |
Gayflower: Spring 2025 Plan
This documents the replacement of the fresh water system in the Gayflower that was completed May 2025.
"Before" Photo:
0. General conditions
- Install plywood on rear wall to support the plumbing stack for the pump outlet. DONE
- Get a big tool box and parts box to organize all our plumbing tools and parts DONE
1. IBC Tote Replacement
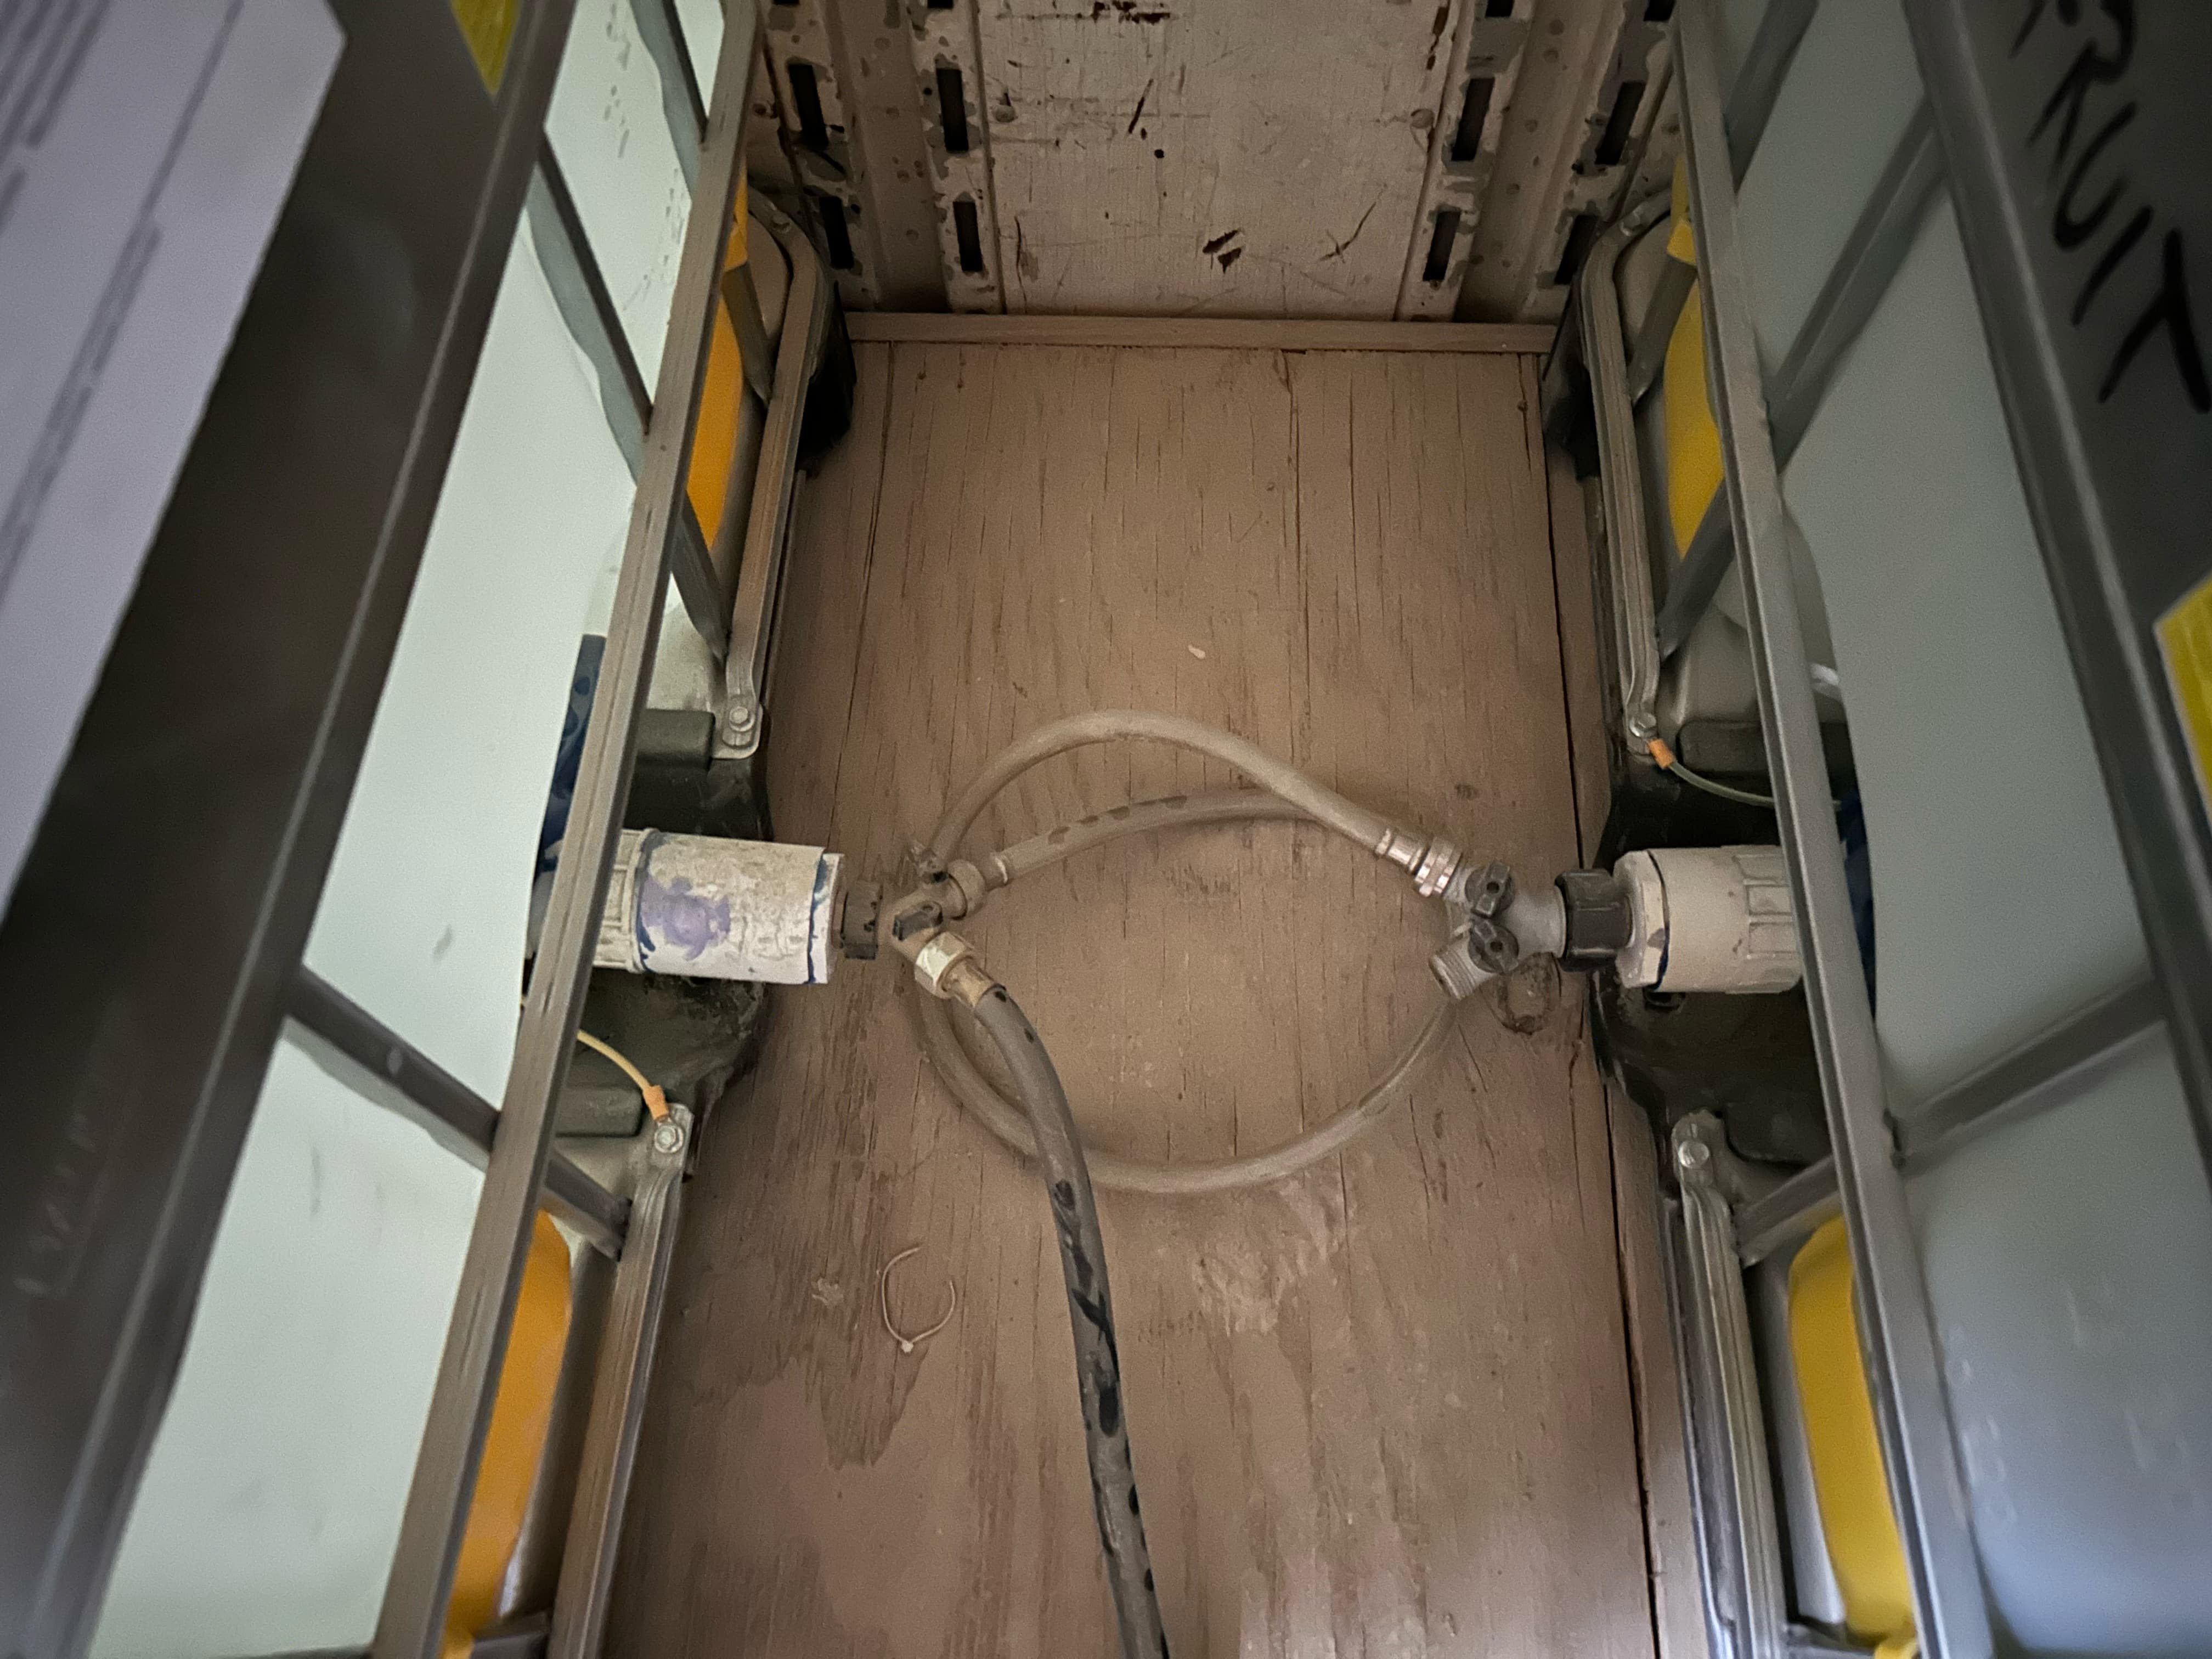
Replace all seven totes with new ones and completely replace all plumbing connecting them.
This design had one bug: the pump would not work without a check valve at the input. We added that in and everything worked great!
Design considerations
- Use flexible hoses instead of PVC with glue, for easy replacement, more flexibity, and less likely to break
- Pump requires 1" diameter inflow. To accomplish this the nearest IBC tote will be connected with 1" PEX-B. All the other totes can be connect to each other with 3/4" hose just to allow them to balance with each other.
- Shutoff valves everywhere for safety and quick repairs
New plumbing configuration
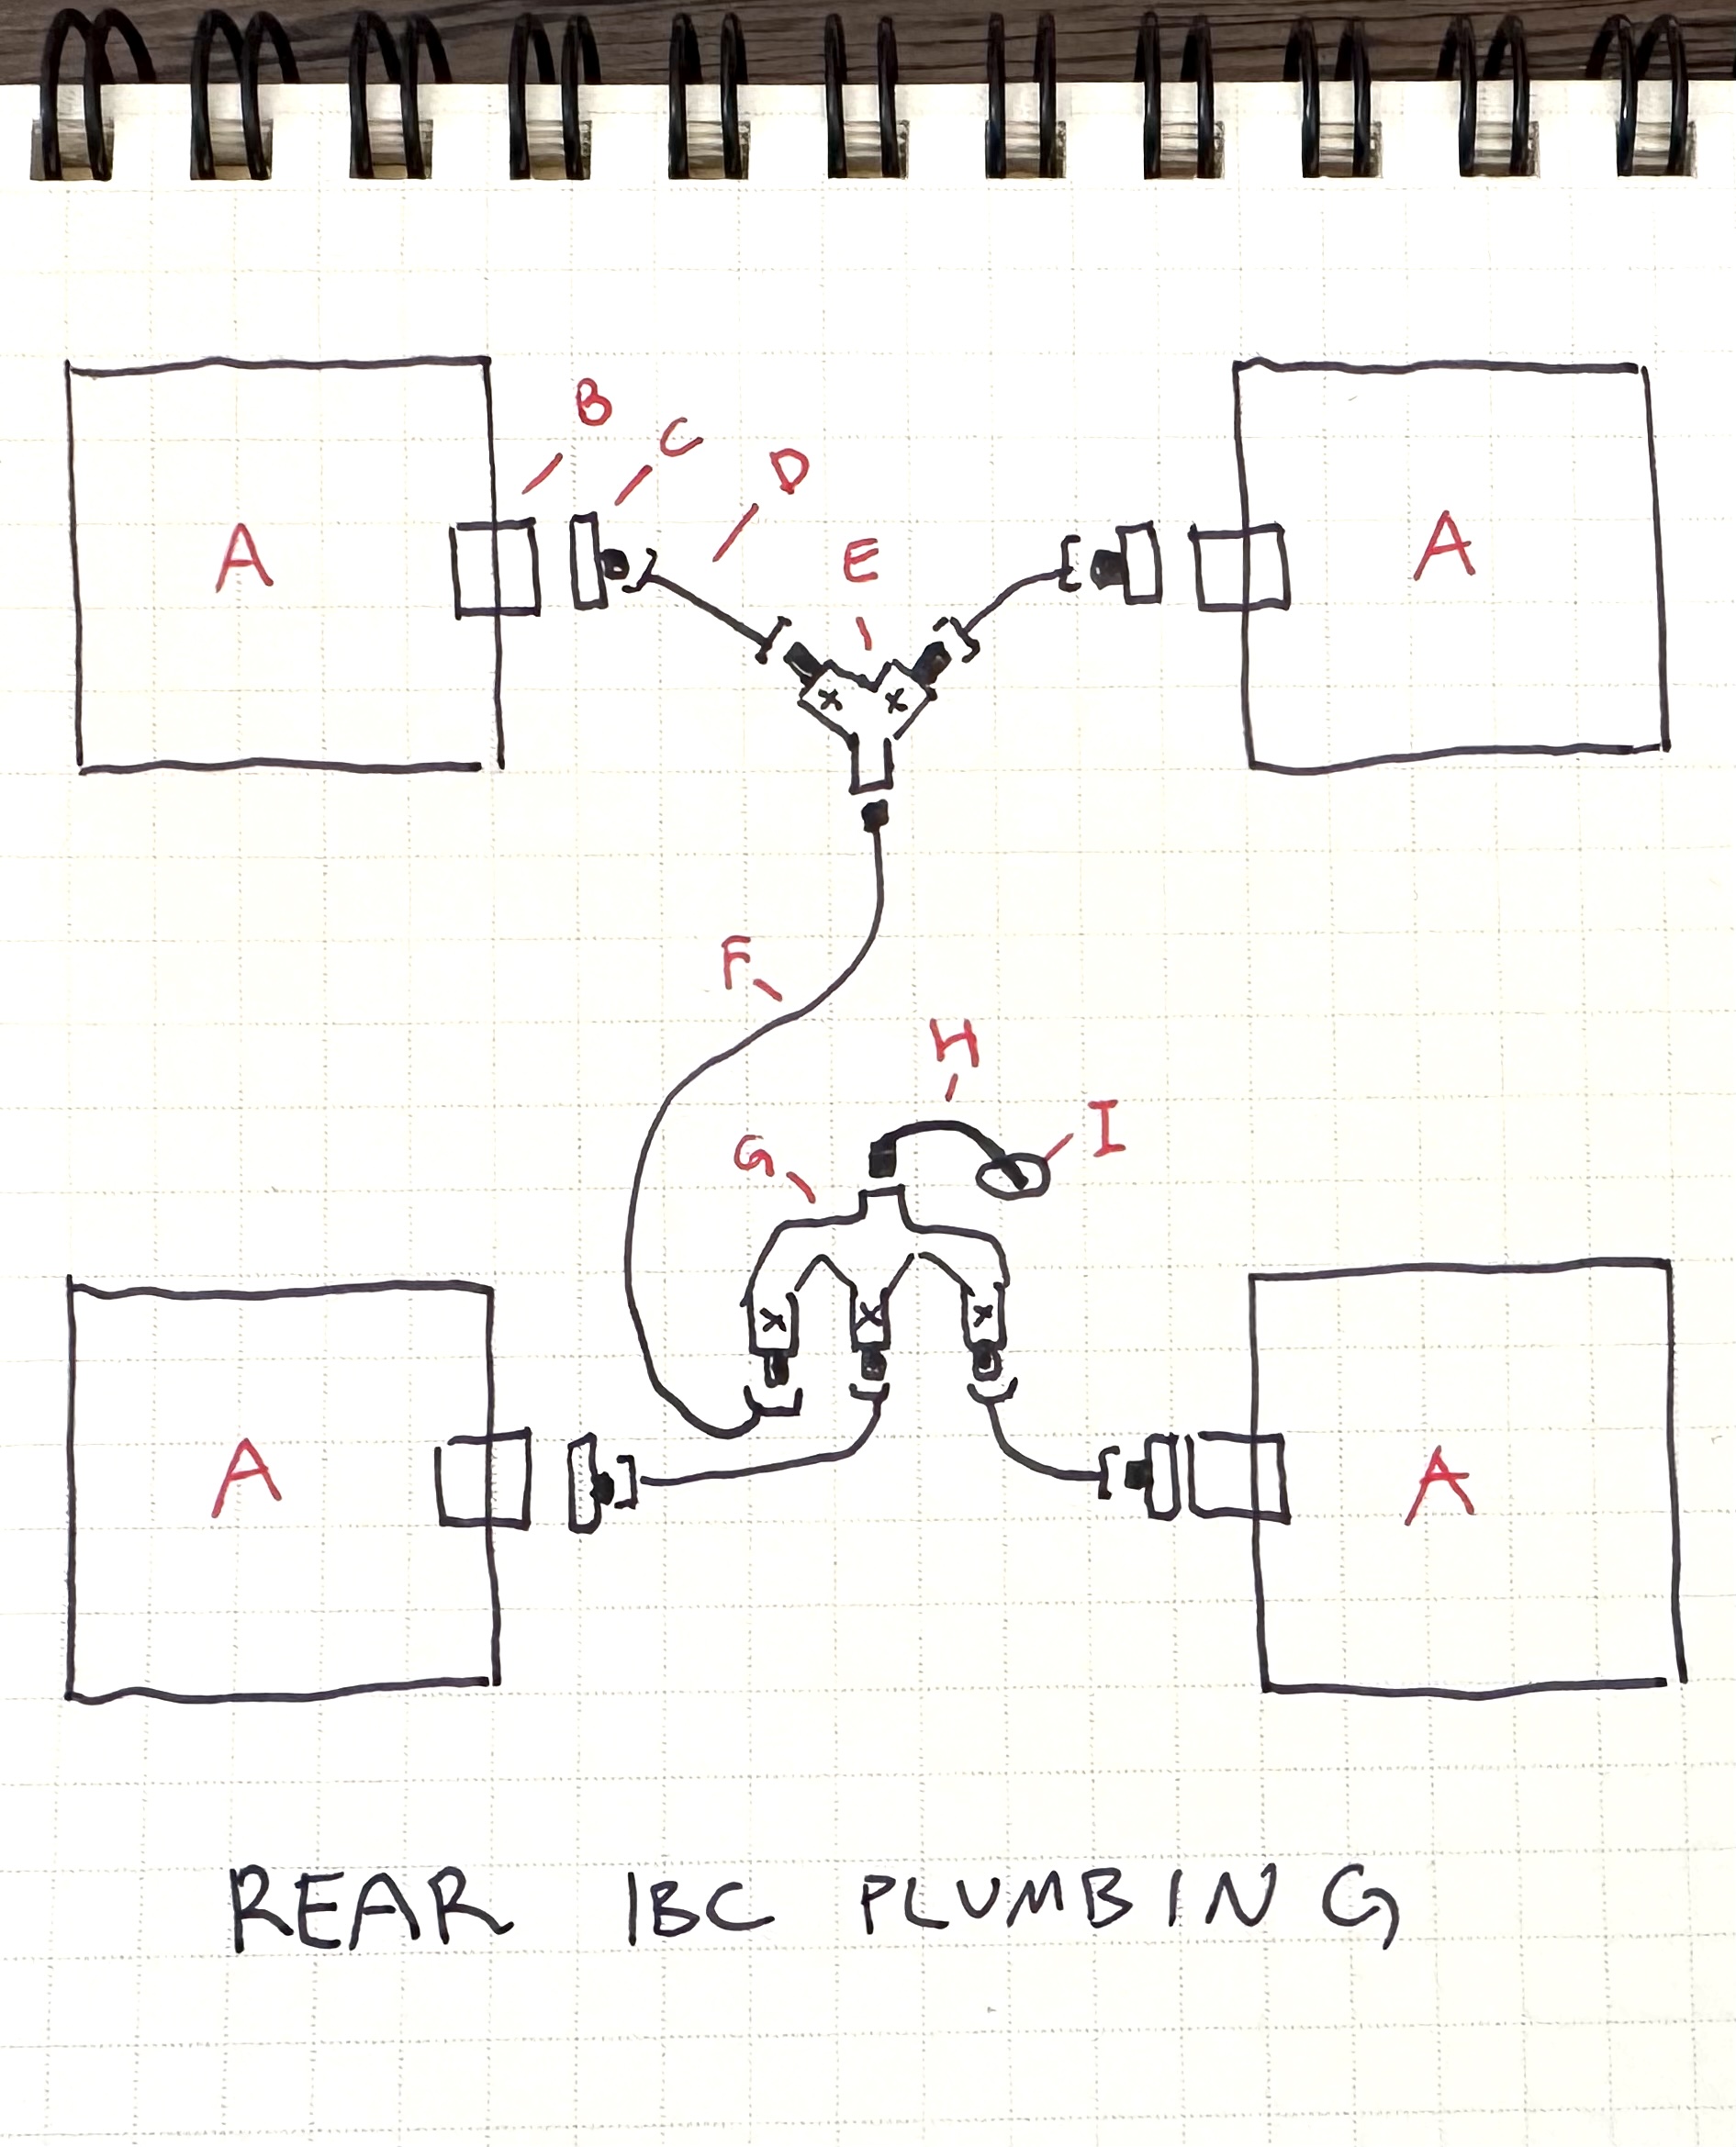
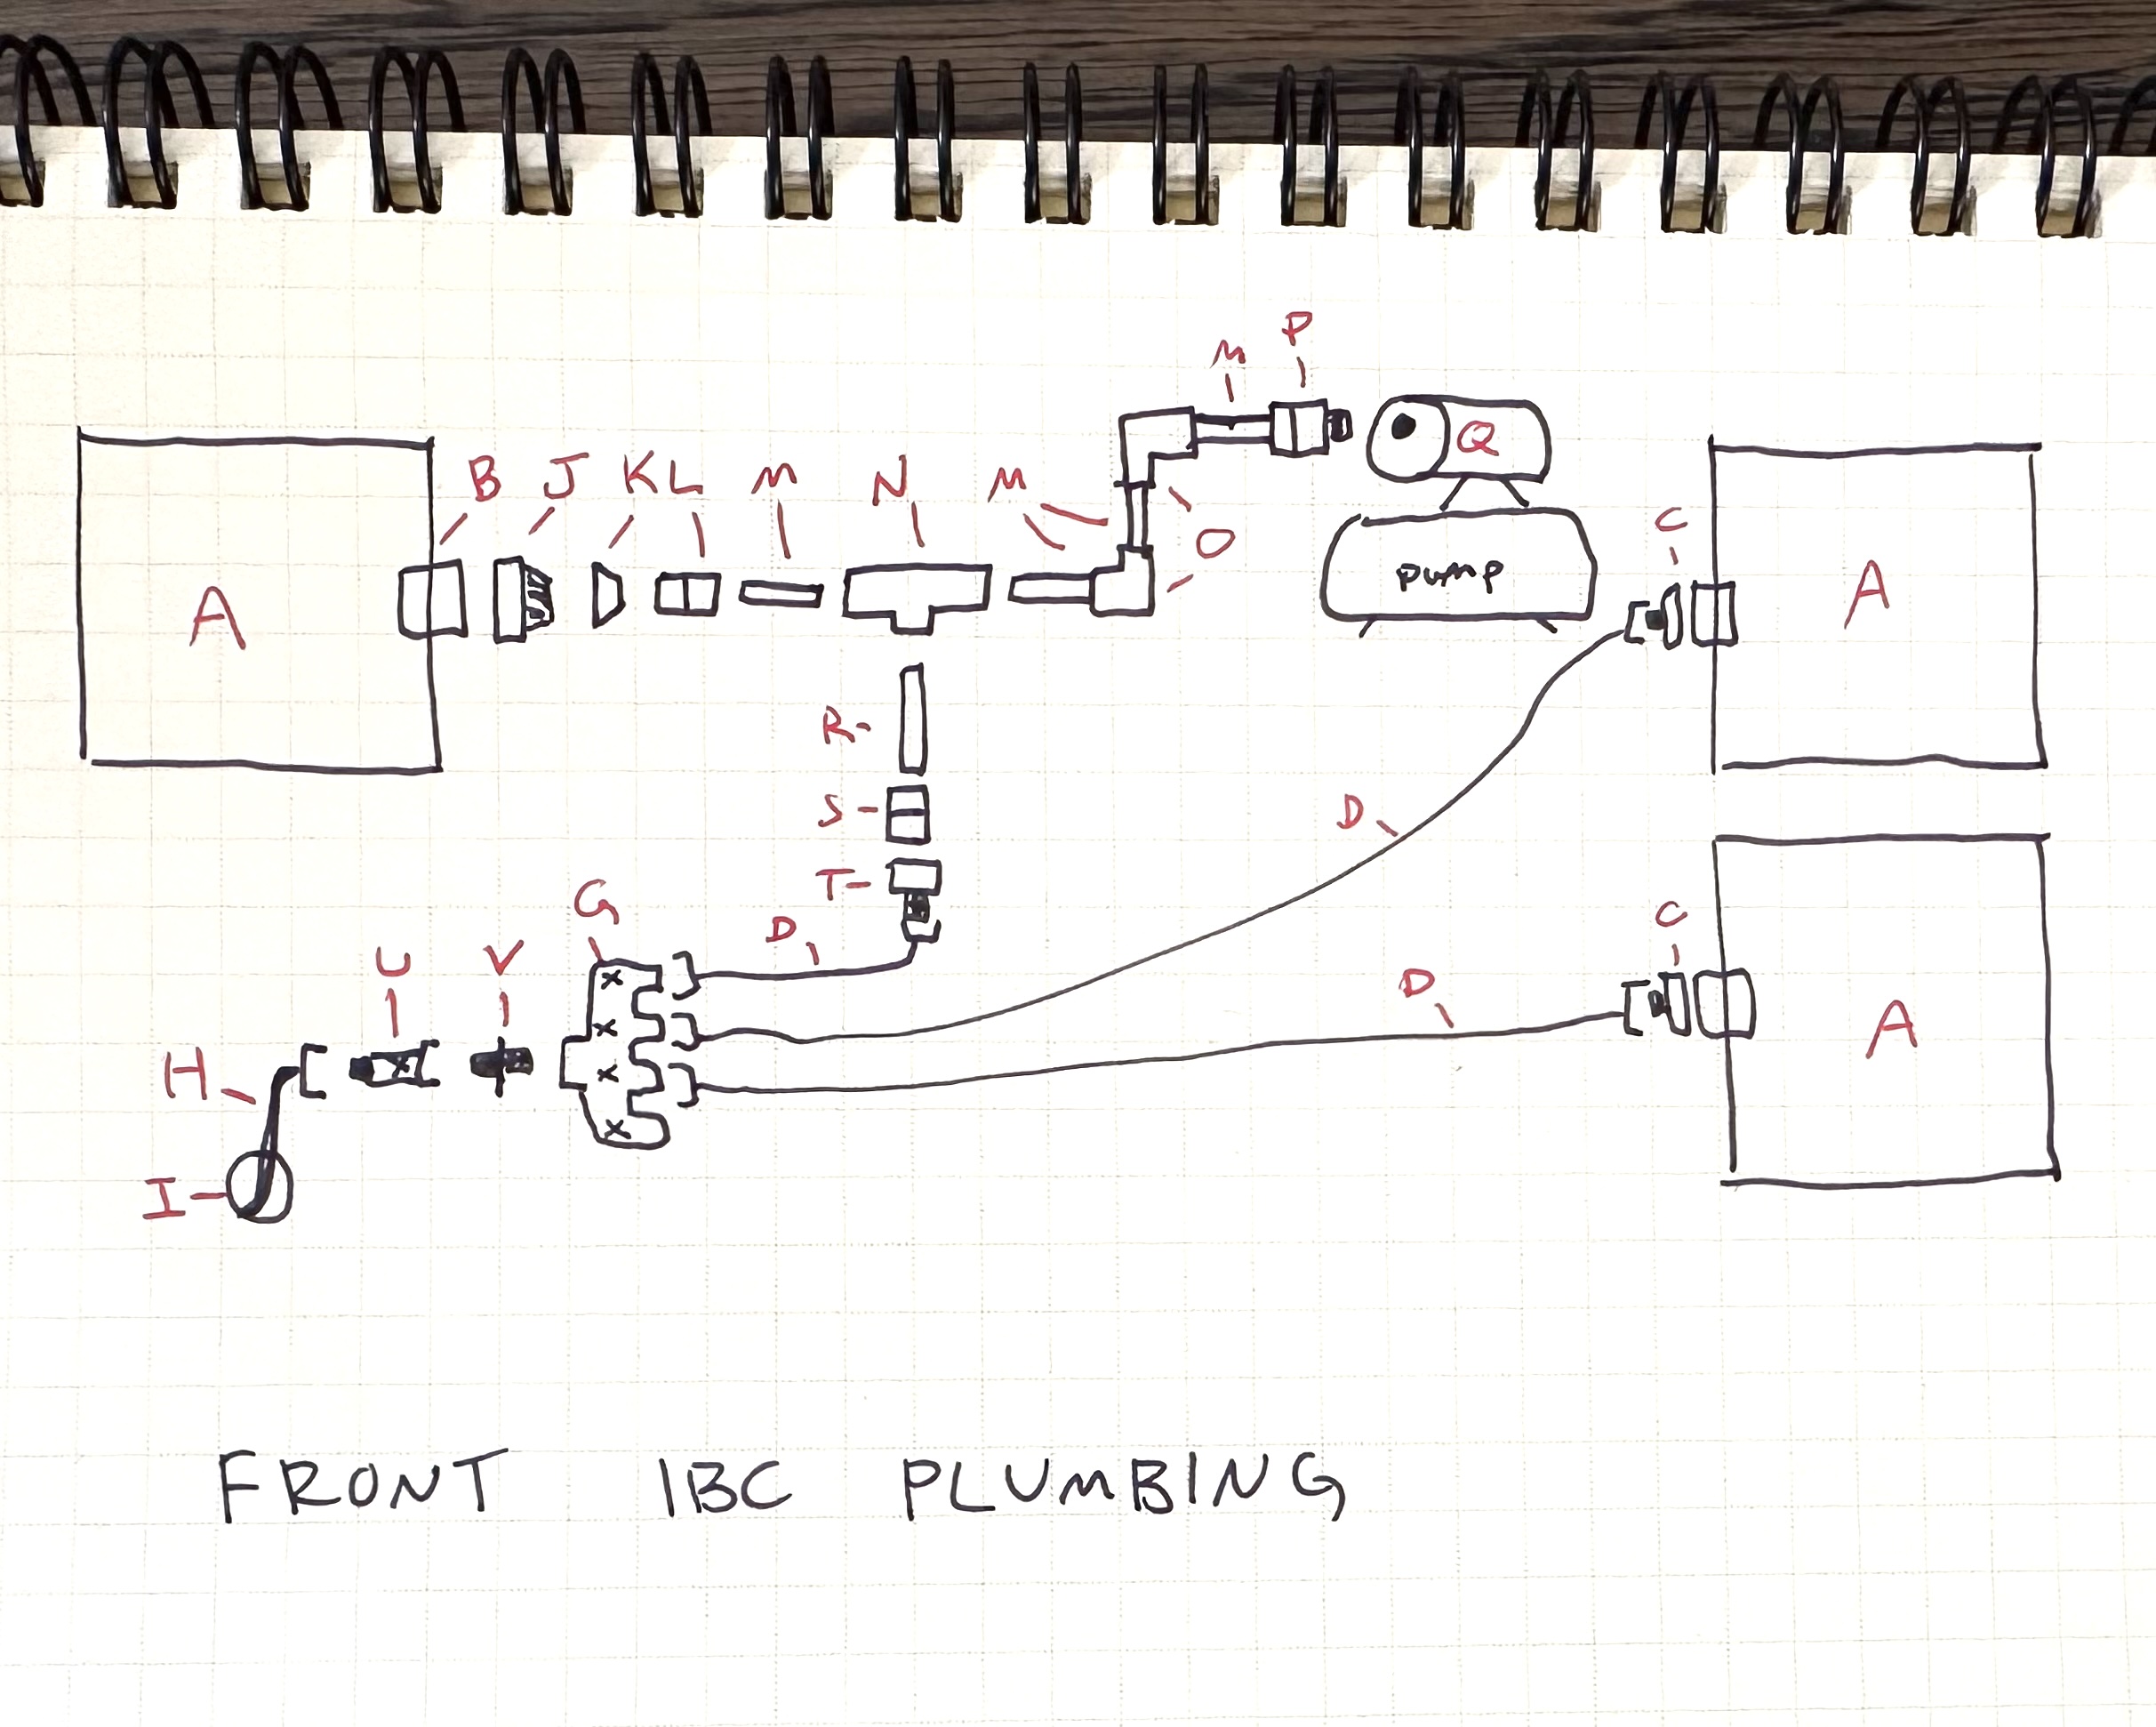
| A | IBC tote |
| B | 2" Camlock valve, preinstalled on tote |
| C | 2" Camlock to 3/4" Male Garden Hose adapter |
| D | 2' long 3/4" Female to Female Garden Hose Extender (get some 1' as well to minimize slop) |
| E |
3/4" Garden Hose splitter with valves (F - M - M) |
| F | 5' long 3/4" Garden Hose (M - F) |
| G |
3/4" Garden Hose three way splitter with valves (F - M - M - M) |
| H |
50' 3/4" Garden Hose (M - F) |
| I |
Hole in floor |
| J |
2" Female Camlock to 2" Male NPT Adapter, Stainless Steel (example) |
| K |
2" Female NPT to 1" Female NPT |
| L |
1" Male NPT to 1" Sharkbite |
| M |
1" PEX-B |
| N |
1" - 1" - 3/4" Reducing Tee (Sharkbite) |
| O |
1" Sharkbite Elbows |
| P |
1" Sharkbite to 1" Male NPT |
| Q |
Pump, with 1" Female NPT inlet |
| R |
3/4" PEX-B |
| S |
3/4" Sharkbite to 3/4" Male NPT |
| T |
3/4" Female NPT to 3/4" Male Garden Hose |
| U |
3/4" Garden Hose Shutoff Valve (M-F) |
| V |
3/4" Garden Hose Male to Male Coupler |
The pump requires 1" diameter input, so it draws from the nearest tote using 1" PEX-B (put together with sharkbite fittings). That tote, and the other six, are all interconnected using 3/4" hoses, which allow the water to seek a level between them.
2. Evaporative Cooler Supply Rerouting
The water supply line for the evaporative cooler should be rerouted so it does not interfere with that IBC tote. Also, it might be responsible for the leak at the top of the pump.
3. Rework plumbing above the pump
The main goal here is to make something that allows for quickly swapping out a failed pump, and eliminate the PVC+glue that is prone to leaks.
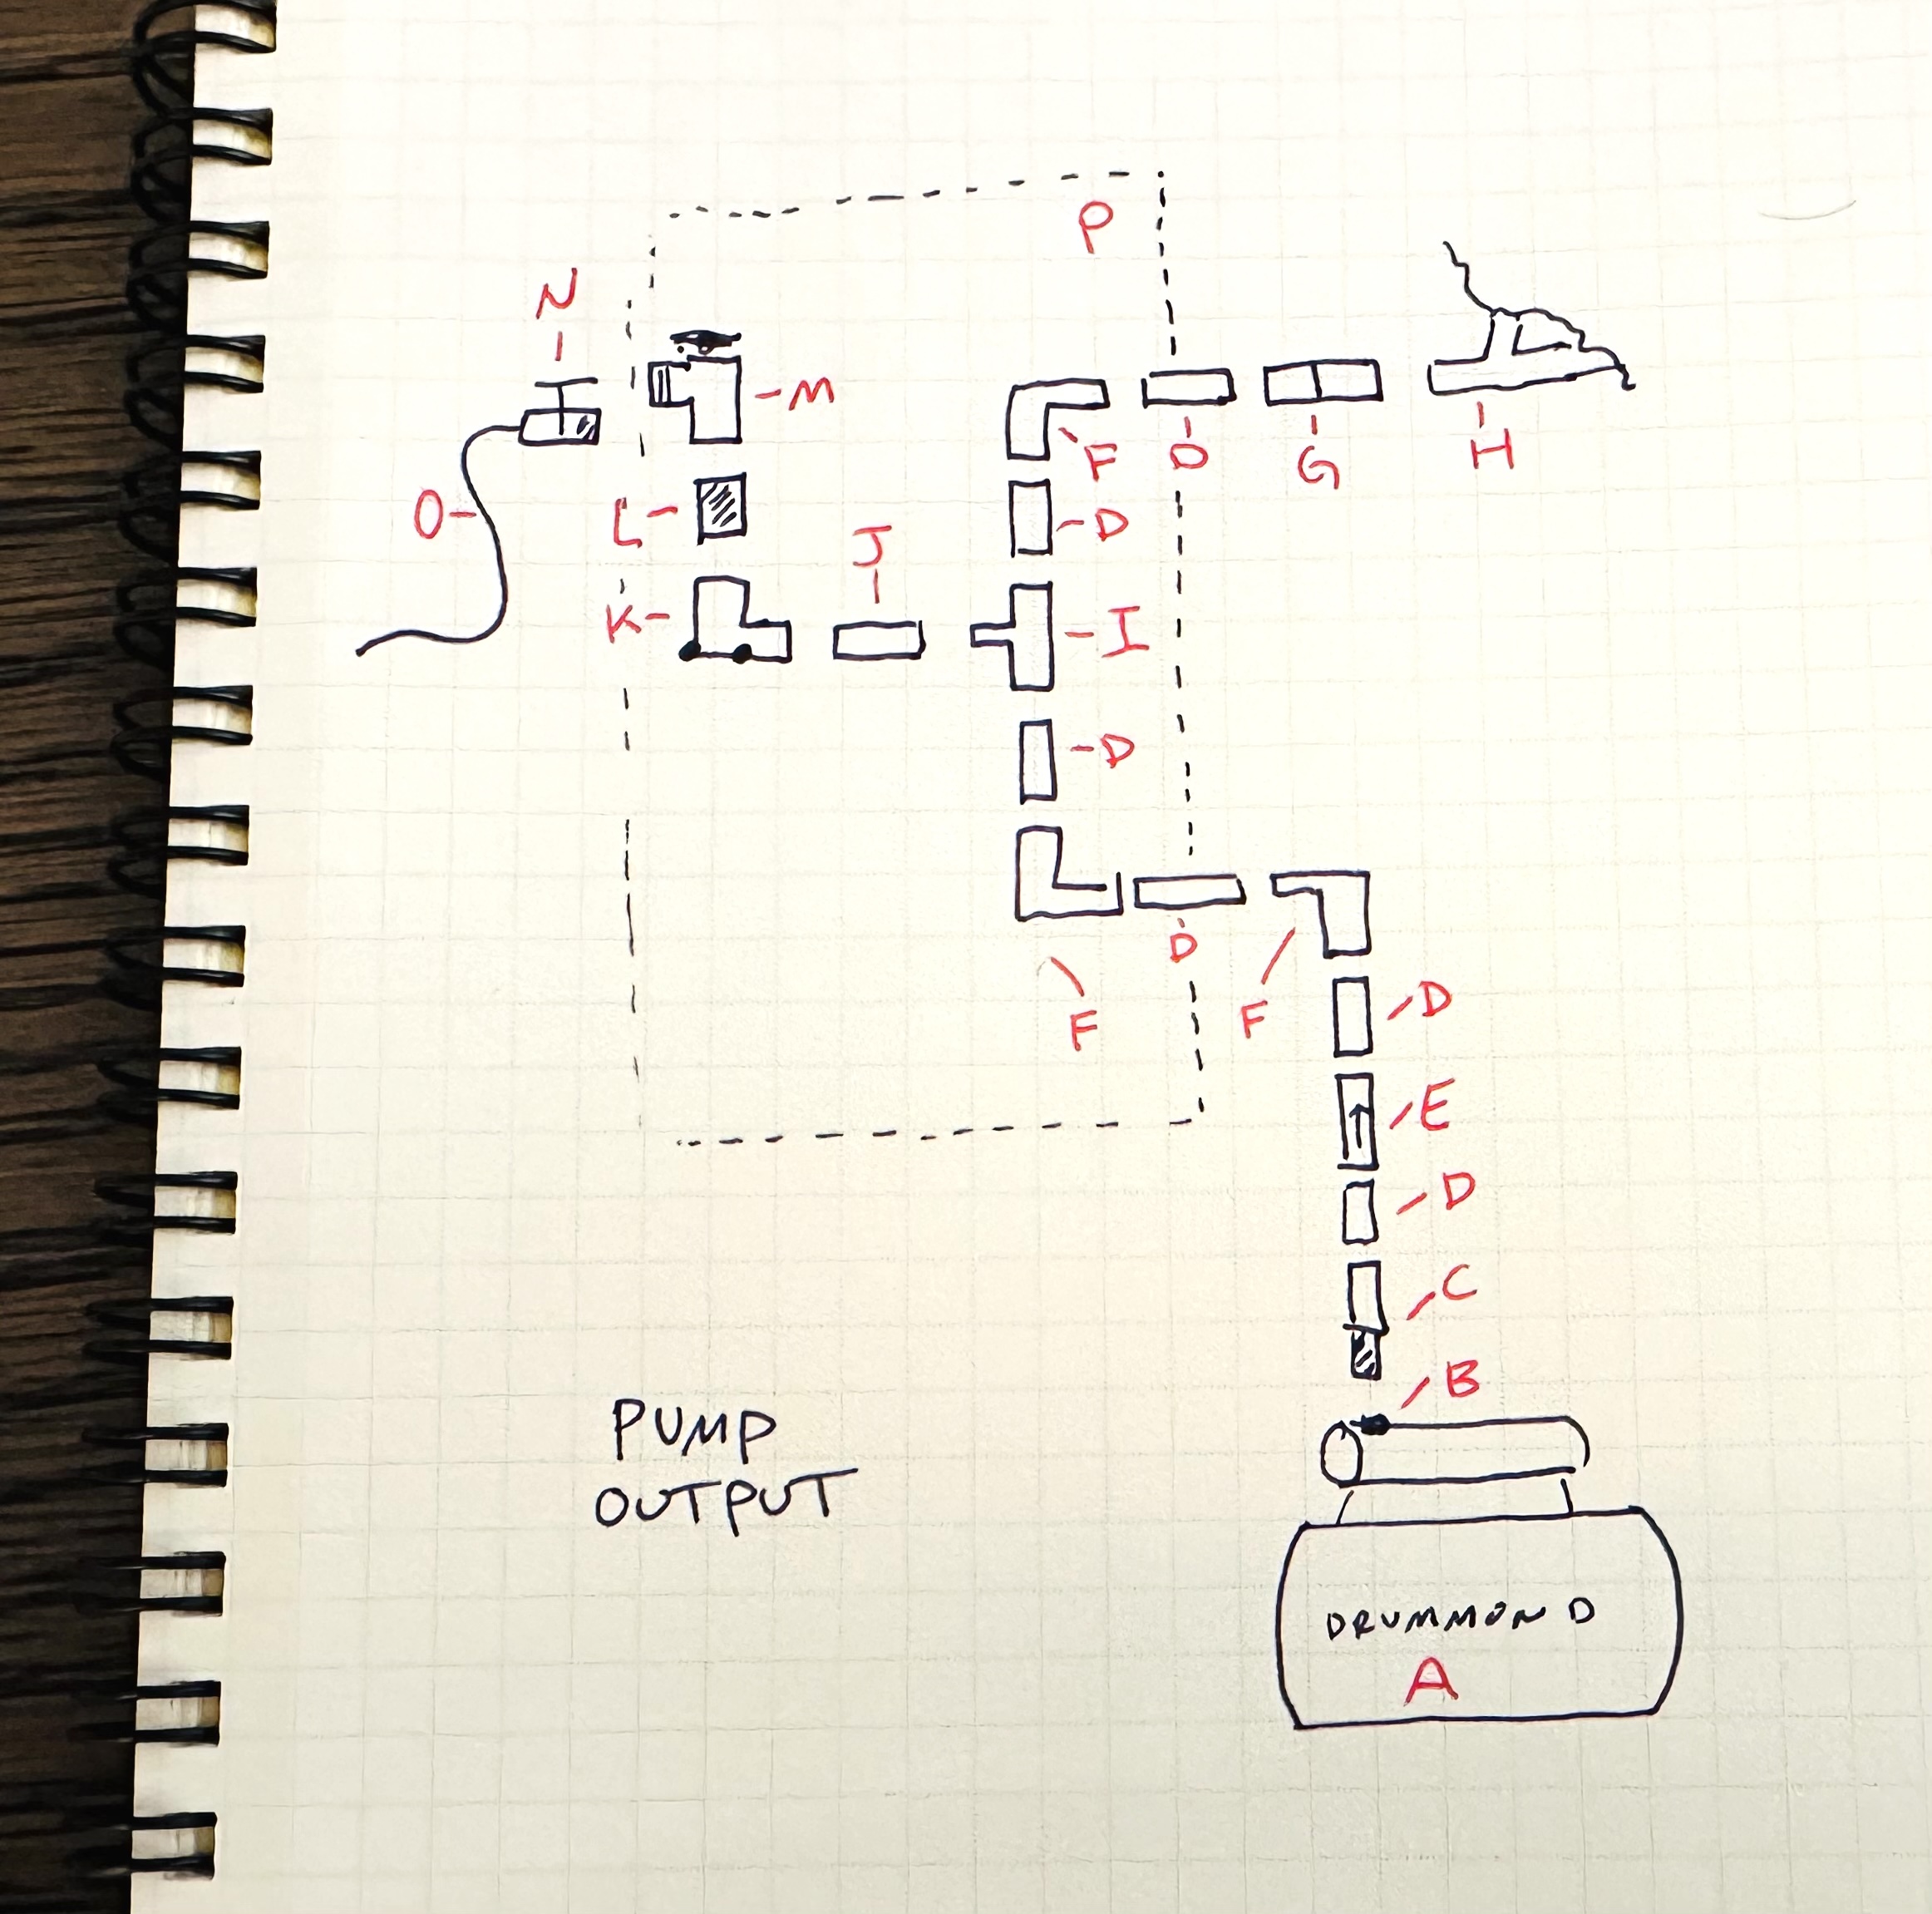
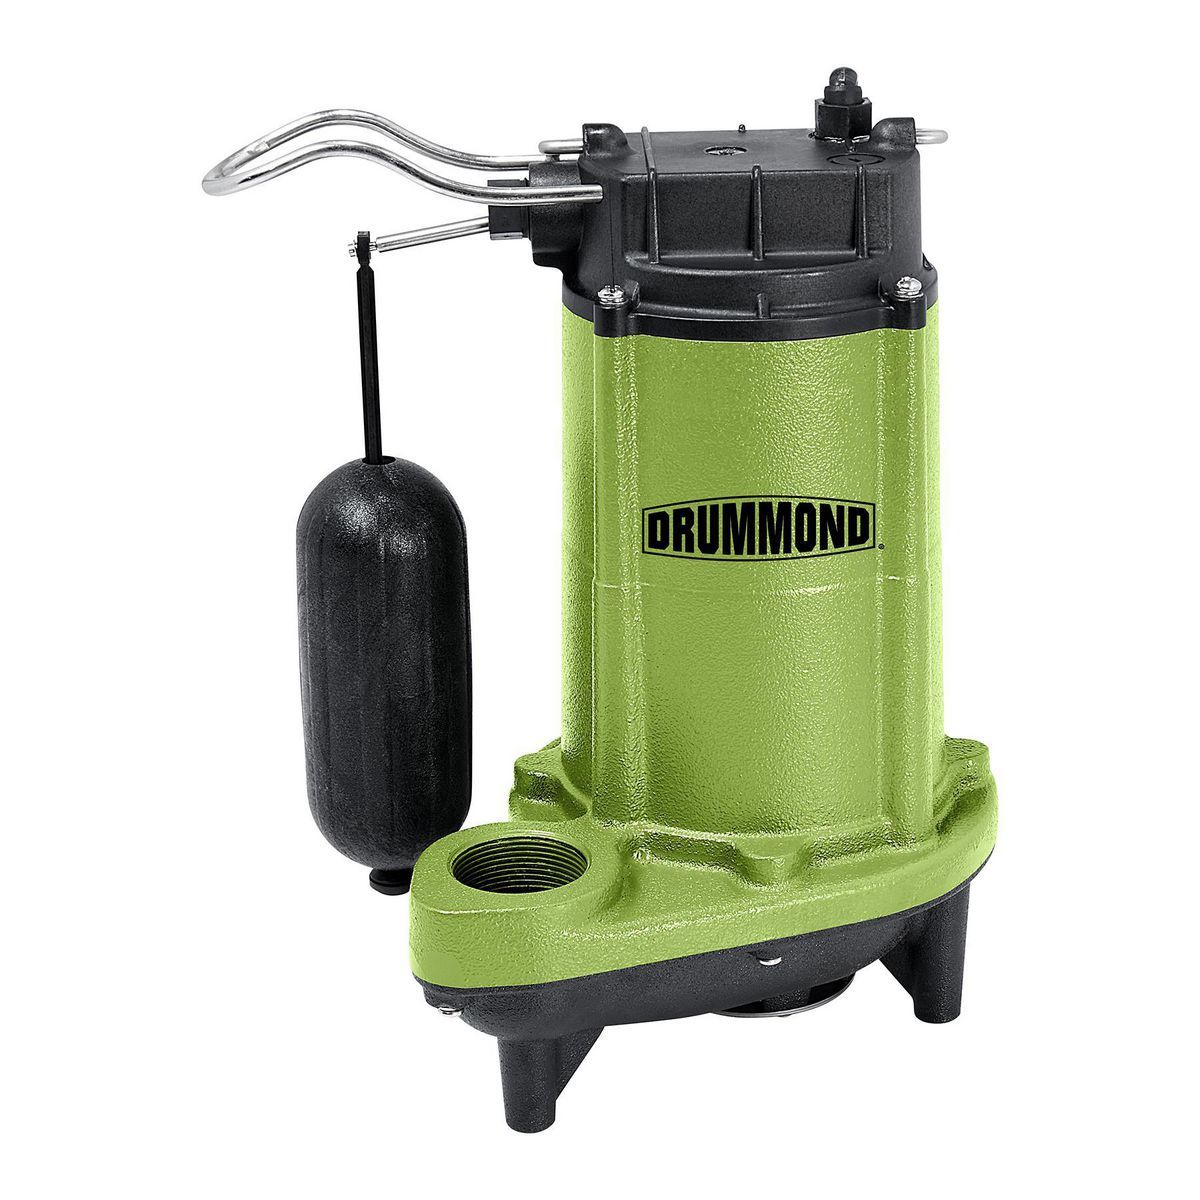
| A | Existing DRUMMOND 1 HP Stainless Steel Shallow Well Pump and Tank with Pressure Control Switch - 950 GPH |
| B | 1" Female NPT output |
| C | 1" Male NPT to 1" Sharkbite U140LF |
| D | 1" PEX-B Pipe |
| E | Sharkbite 1" Check Valve (U2020-0000LF) Provide Sharkbite disconnect tongs (U715) for winterizing. |
| F | 1" Sharkbite Elbow |
| G |
1" Sharkbite PVC Fittings Also provide different connections because I don't know what is over there |
| H |
Existing water line, splitting to cold water and hot water |
| I |
1" - 1" - 3/4" Reducing Tee (Sharkbite) |
| J |
3/4" PEX-B Pipe |
| K |
Brass Push Drop-Ear Elbow (3/4" Sharkbite to 3/4" FNPT) (U340LF) |
| L |
3/4" Male NPT to 3/4" Male Garden Hose (amazon) |
| M |
3/4 in. Evaporative Cooler FGH x MGH Sill Cock |
| N |
1/4 in. x 1/8 in. Evaporative Cooler Angle Needle Valve |
| O |
1/4 in. Evaporative Cooler Copper Tube leading to swamp cooler |
| P |
This section to be mounted on plywood |
4. Urinal leak repair
Reference photo:
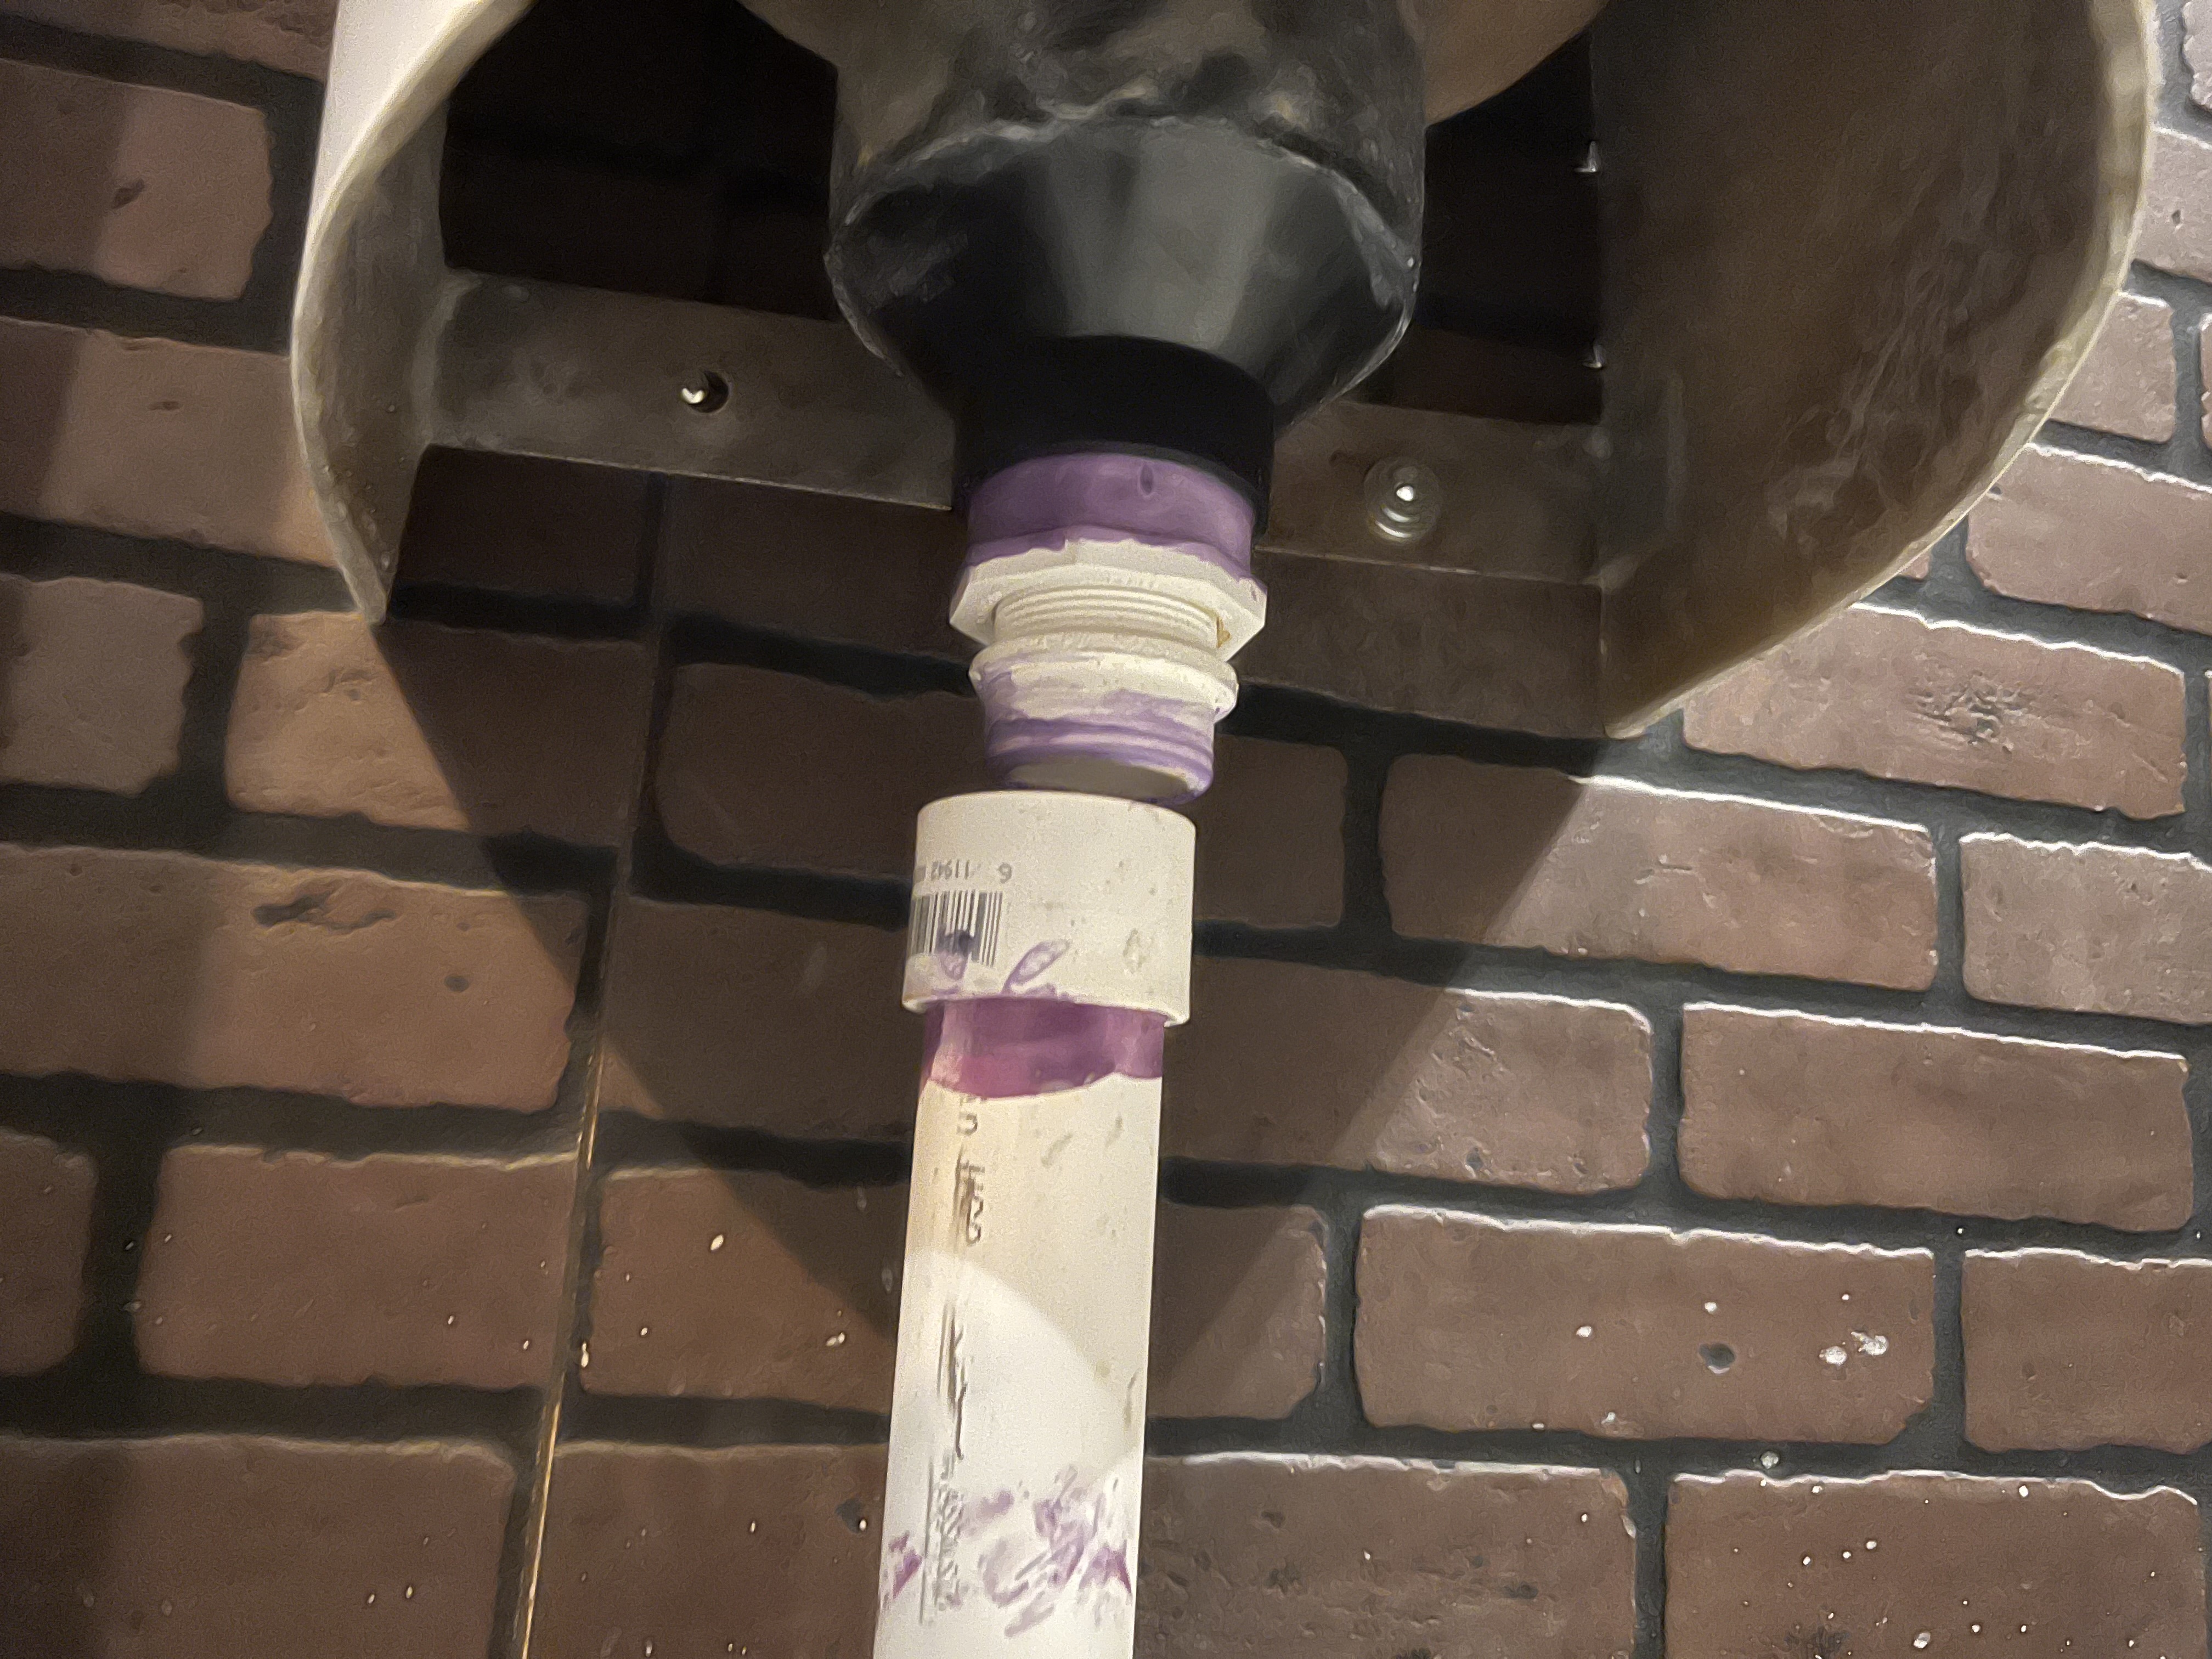
Not sure what size PVC this is. It is most likely 1 1/2" or 2".
- this might be the world's simplest fix, just glue it back
- but without knowing what it's connected to underneath, it might be a situation where whenever the black water tanks shift around, they move the pipes
To repair this, we would need:
- Short length of PVC pipe (1 1/2") (2")
- PVC couplings (1 1/2") (2")
- Fernco flexible couplings (this or this)
- PVC male - slip adapter
- Purple primer
- Fine tooth saw or PVC pipe cutter
- PVC cement
Everything here is going to be available from Home Depot.
Consolidated Shopping List
This list has been added to the manifest on the Reno Warehouse (2025) page.
| Qty | Item | Vendor |
Notes |
| 4 | 1" Male NPT to 1" Sharkbite | Sharkbite U140LF | |
| 10' | 1" PEX-B Pipe - White | Home Depot | |
| 5' | 3/4" PEX-B Pipe - White | Home Depot | |
| 2 | Sharkbite 1" Check Valve | Sharkbite U2020-0000LF | |
| 1 | Sharkbite Disconnect Tongs 1" | Sharkbite U715 |
|
| 1 | Sharkbite Disconnect Tongs 3/4" | Sharkbite U713 |
|
| 7 | Sharkbite 1" Elbow | Sharkbite U260LF | |
| 3 | Sharkbite 1" Coupling |
Sharkbite U020LF |
|
| 1 | Sharkbite PVC Transition (1") | Sharkbite UIP4020 |
|
| 1 | Sharkbite PVC Transition (3/4") | Sharkbite UIP4016 |
|
| 1 | Sharkbite 1" to 3/4" Reducing Coupling | Sharkbite U060LF |
|
| 3 | Sharkbite 1" - 1" - 3/4" Reducing Tee | Sharkbite U416LF | |
| 1 | Sharkbite Brass Push Drop Ear Elbow (3/4" Sharkbite to 3/4" FNPT) |
Sharkbite U340LF |
|
| 1 | 3/4" Male NPT to 3/4" Male Garden Hose | Amazon | comes as a two pack to provide spare |
| 12 | 1" Pipe Hangers | Home Depot | 12 total needed. Check quantity per pack, don't order 12 packs! |
| 10 | 3/4" Pipe Hangers | Home Depot | 10 total needed. Check quantity per pack, don't order 10 packs! |
| 1 | 1/4 in. x 1/8 in. Evaporative Cooler Angle Needle Valve | Home Depot (link) | |
| 50 feet | 1/4 in. Evaporative Cooler Copper Tube | Home Depot (link) | |
| 1 | 3/4 in. Evaporative Cooler FGH x MGH Sill Cock | Home Depot (link) | |
| 1 | 1/4 in. x 1/8 in. Evaporative Cooler CC and MPT Male Union | Home Depot (link) | spare part |
| 1 | 1/4 in. Compression Brass Nut Fitting | Home Depot (link) | spare part |
| 1 | Mini Copper Tubing Cutter | Home Depot (link) | tool |
| 20 | Copper tube straps | Home Depot (link) | need 20 total, not 20 packs |
| 7 |
Rebottled or new IBC totes 330 gallon |
The Cary Company EST104097 |
To ship to Empire |
| 7 | 2" Camlock to 3/4" Male Garden Hose | The Cary Company or Amazon |
|
| 2 |
3/4" Female - Female Garden Hose 5' Length |
Amazon | |
| 3 | 3/4" Female - Female Garden Hose 2' Length |
Amazon | |
| 3 | 3/4" Female - Female Garden Hose 1' Length |
Amazon | |
| 2 |
3/4" Male - Female Garden Hose 6' Length |
Amazon | |
| 1 | 3/4" Garden Hose Y-Splitter With Valves | Amazon | |
| 2 | 3/4" Garden Hose Three way splitter With Valves | Amazon | |
| 2 | 3/4" Garden Hose, 50' | Amazon | |
| 2 | 2" Camlock to 2" Male NPT Adapter | The Cary Company or Amazon (two included) |
|
| 2 | 2" Female NPT to 1" Female NPT Reducer | Amazon | |
| 10' | 1" PEX-B - White | Home Depot | |
| 2' | 3/4" PEX-B - White | Home Depot | |
| 2 | 3/4" Sharkbite to 3/4" Male NPT | Sharkbite U134LF |
|
| 2 | 3/4" Female NPT to 3/4" Male Garden Hose | Amazon | |
| 2 | Garden hose shutoff valve 3/4" male to 3/4" female |
Amazon | |
| 1 set | Garden Hose Couplers (M-M and F-F) | Amazon | |
| 1 | 3/4" Plywood 24" x 48" panels |
Home Depot in Reno |
They sell precut 24x48 pieces (or buy 4'x8' pieces and cut in four)
Consider buying an extra 14 to replace crappy shelves in Empire Fort |
| 20 | Wood-to-metal self-driving screws #10 diameter 1 1/2" |
Home Depot in Reno (link) |
We might have them in the tool fort |
| 1 | Teflon Tape | Home Depot |
|
| 1 | Tru-Blu Pipe Thread Sealant with PTFE |
Home Depot |
|
| 1 | PEX-B cutter |
I might already have this in the LED Lab |
|
| 1 | 2" Ratcheting PVC cutter | Home Depot |
|
| 1 | Assortment of wood screws | Amazon |
|
| 1 | Storage packout on wheels for all plumbing parts and tools | Home Depot Milwaukee Packout |
probably best to buy this at Home Depot in person |
Gayflower Leak Prevention
If one of the black or grey water tanks leaks, it pretty much goes straight onto the playa. There was a small leak in 2024 mostly caught in a bucket. This page is mostly a thought experiment in how we could solve this by constructing a bathtub out of a pond liner.
The idea
We install a "bathtub" around the entire grey/black water tank area to serve as secondary containment. This could be made out of a 45mil EPDM Pond Liner which seems like it would be bulletproof. There is also something called RPE which is even stronger.
The pond liner would be folded in the corners as follows:
It is probably enough for the sides of the liner to be 8" - 12" to create a large basin that could handle a serious spill.
At the front of the truck, the corner folds would be permanently glued together with EPDM pond liner adhesive.
At the rear of the truck, we would construct a low gate (like on the back of a pickup truck), hinged at the bottom, out of wood, with very heavy duty latches holding it up. The gate would be connected to the pond liner. It would remain up/closed during the week to seal the bathtub and provide protection. It could also be lowered off-playa to drain the tanks using the hoses provided. In the event of a an emergency spill, we would pump the grey water out of the bathtub before attempting to open the hinged door.
Remaining Questions
I don't know how easy it would be to retrofit this, since there is a subfloor above the tanks. Here are some questions to study:
- How hard is it to work in that crawlspace?
- How is the subfloor above supported? Is it supported entirely from the sides, or are there columns coming down in the middle which would interfere with layout out a pond liner?
- If there are columns of some sort, can they be removed temporarily so that the pond liner, with some protection, can be slipped underneath.
- Otherwise would we be able to do two separate pond liners, for left and right sides of the truck?
- What are the exact dimensions of everything?
- While we're working on this, could we reinforce the subfloor in back which holds the fresh water tanks?
2025 Shortcut
For 2025, knowing that there is already a little bit of a black liner on the floor (as seen in this picture), we could probably improve the situation a lot by just extending the liner in the very rear to create that flap in the back. This can be done without taking out the tanks and relining everything. It would probably be sufficient to prevent leaks like this year's small leak, although it would not be that helpful in case of a more significant failure.
How we might do this:
- Get a 2x10 board (at least the length that the interior is wide, probably 101"). Maybe this is 2 pieces of 1" plywood glued together? Cut it to size in Empire.
- Get a bunch of hinges so it can open and close
- Get some latches for the sides and middle to hold it closed
- Get a big sheet of super thick EPDM, say, 15' x 3'. Glue it to the existing liner and then run it up the side of the wood board.
There is not that much space for the new door behind the rearmost tanks. It might have to be mounted in the steel frame of the truck doors.
Gayflower 2.0 Cost Estimates
This is an overview of the costs and benefits of using a single trailer for shower, toilets, fresh, and grey water as opposed to using OSS services (what's OSS, you ask?).
Assumption: 2300 gallons fresh water, 2300 gallons waste water (mostly grey), two toilets, 2025 OSS pricing.
Scenarios:
OSS + Portos - using OSS providers with portopotty rental
OSS + Ecozoic - using OSS with Ecozoic toilets
Gayflower - using the Gayflower
Water Only - using a water trailer for fresh and grey water; OSS for everything else
Annual Operating Costs
| Item | OSS+Portos | OSS+Ecozoic | Gayflower | Water Only | Notes |
| Potable Tank 1000gal | 1500 | 1500 | 0 | 0 | SSS price incl pump and hose |
| First Fill 1000gal | 1000 | 1000 | 0 | 0 | SSS price $1 first fill |
| Addl Fill 1300gal | 2275 | 2275 | 0 | 0 | SSS price $1.75 each addl gal |
| Grey Tank Rental 250gal | 400 | 400 | 0 | 0 | SSS tank rental only |
| Grey Water Pump 2300gal | 4600 | 4600 | 0 | 0 | SSS price per gallon |
| Gerlach Water Fill | 0 | 0 | 1495 | 1495 | Gerlach 2025 price 0.65 |
| Portopotty Rental (2) | 2082 | 9211 | 0 | 9211 | United Site price for porto Ecozoic prices based on 2024 |
| Trailer storage Empire | 0 | 0 | 1200 | 1200 | Empire Storage and Rental (Temen probably similer) |
| Annual trailer DOT inspection | 0 | 0 | 250 | 250 | |
| Round trip OSS delivery | 0 | 0 | 1350 | 1350 | |
| BMORG OSS Fees | 0 | 0 | 275 | 275 | |
| Total | 11857 | 18986 | 4570 | 13781 | |
| savings over ecozoic | 14,416 | 5,205 |
Build Costs (est)
| Item | Gayflower | Water Only | Notes |
| 53ft x 102in Dry Van Trailer, Used, Nevada | 16000 | 0 | Price est based on TruckPaper completed auctions |
| 53ft x 102in Flatbed, Used, Nevada | 0 | 8000 | |
| 7 IBC Totes, 330, new, delivered Empire (Fresh Water) | 4000 | 4000 | Cary Company |
| 7 IBC Totes, 330, used (Grey Water), pickup Reno | 0 | 1050 | Nevada Container Supply |
| 10 Grey Water Tanks, 250 gal each | 5790 | 0 | PolyJohn HT01-0250 at Webstaurantstore |
| Fresh Water Hoses and Connectors | 2000 | 2000 | |
| Grey Water Hoses and Connectors | 2000 | 2000 | |
| Pumps | 340 | 340 | Harbor Freight DRUMMOND 1 HP Stainless Steel Shallow Well Pump plus backup |
| Steel hardware and welding | 10000 | 2500 | |
| Floor decking | 5000 | 0 | |
| Dry Van modifications for doors and utility access | 8000 | 0 | |
| Interior framing | 5000 | 0 | |
| Macerating RV toilets | 3000 | 0 | (two) |
| Waterless urinals | 600 | 0 | (two) |
| Interior Plumbing Parts | 3000 | 0 | |
| Sinks, faucets, vanity | 3000 | 0 | |
| Shower enclosures, shower heads | 2500 | 0 | (two) |
| Pond liner secondary containment | 3000 | 3000 | For gayflower, secondary containment is permanently built into trailer. For water only, secondary containment consists of external evap ponds that must be set up on playa. |
| Lighting and electric | 4000 | 0 | |
| Parts, not including labor | 77230 | 22890 | |
| Labor | 50000 | 10000 | how much of this can you get from your campers? How good are you at hiring and supervising construction workers? Where are you going to build it? |
| Parts, including labor | 127230 | 32890 | |
| years to amortize | 9 | 6.3 |
2026 Remount Shower
Existing condition (spring 2025):
Problems:
- galvanized pipe is corroding
- too much weight hanging on ceiling (fell down in 2025)
Plan:
- Mount shower heads from the wall (on the lumbar right above the shower enclosure)
- Replace pipes for shower with PEX-B
STATUS AS OF FALL 2025
- During the fall visit to the Gayflower we took down the existing showers but we didn't have time to put up new ones.
- If we want to get the showers working again, we'll need the following parts:
- 4x Standard Shower Arm (45° bend, M-M 1/2 pipe)
- About 4x 3/4" - 3/4" - 1/2" reducers (sharkbite or PEX-B)
- A bunch of 3/4" and 1/2" ells (sharkbite or PEX-B)
- Everything else we need for this project is already in the Gayflower under the sinks
- The condition of the Gayflower is pretty miserable; we might just build a new shower trailer. See #gayflower channel in discord for the latest discussion
Shopping list:
qty 4 - 1/2 in. Brass PEX-B Barb x 1/2 in. Female Pipe Thread Adapter 90-Degree Drop-Ear Elbow - mounts the shower on the wall using screws
or
qty 4 - Sharkbite Max 1/2 in. Push-to-Connect x FIP Brass 90-Degree Drop Ear Elbow Fitting - just a little bit easier to use Sharkbite
small box - #8 and #10 wood screws
qty 4 - 1/2" x Close MIP Brass Hex Nipple Fitting (or alternate 1/2" MIP x 1/2 MIP) which will connect to existing spring-loaded valves
50' roll - 1/2" PEX-B
qty 10 - Sharkbite Max 1/2 in. Brass 90-Degree Push-to-Connect Elbow Fitting - to connect the PEX-B back to the hot water heater
qty 4 - Sharkbite Max 1/2 in. Push-to-Connect Brass Tee Fitting - to create tees to get water to all four shower heads
box - Apollo 1/2 in. and 3/4 in. 2-in-1 PEX Pipe J-Hook Pipe Support Pro Pack (40-Pack)
5 - 1" x 4" x 8' Premium Kiln Dried Board - as appropriate to create a nice backboard for mounting the shower heads and PEX. Get it cut in half at Home Depot so it's easier to transport
Shower Trailer 2026
Given the poor state of the Gayflower and the crazy cost of replacing it, we're considering a much simpler option of building a basic shower trailer that would be extremely robust and bomb-proof: essentially something more modular and appealing.
To build this, we'd
- start with a simple car trailer (Big Tex and Kaufmann are two vendors who sell them new),
- build a steel frame on top of that to support the floor (this provides room for plumbing and maybe water tanks below)
- build a cedar or teak wood deck using off-the-shelf parts
- build some thin but sturdy wood walls
- install two showers and a vanity with two sinks
- put shower pans below the wood deck (so water drains down through slits in the floor)
- and a staircase which could have hinges to fold up inside for transit.
Some cool features we would probably add:
- about 100 gallons of fresh and waste water in tanks underneath
- built-in pumps and hoses to replace gayflower water movement functionality
- timers with turtle pendant activation
- benches
- led strip lighting
- mirrors
- (?) propane water heater