Winterizing
The Future Turtles provide running water in the shower, sinks, our canteen filler, and the food fort.
All this stuff is stored outdoors in Reno where it freezes every winter. If there is any water left in the plumbing fixtures (like faucets), that water will expand and break the fixture.
This is not hypothetical! It has happened to us almost every year, requiring thousands of dollars of repairs and hours of work that we wouldn't have needed if we had properly winterized our water system.
Luckily, winterizing is easy. All we have to do is connect the whole system up to air instead of water, and blow the air through the system to push out any water. It takes about 20 minutes and can be done by one person.
Where do we get air?
The build team RV has pressurized air available whenever the engine is running.
- The air valve is located in the bay door under the driver window.
- There is a coiled air hose stored in a milk crate in one of the bay doors in the RV. It will click right into the air valve.
- To get the engine running, obtain the ignition key from Jetpack and just start the engine like a normal car.
The Winterization Valve
This is the magic valve that makes winterization easy:
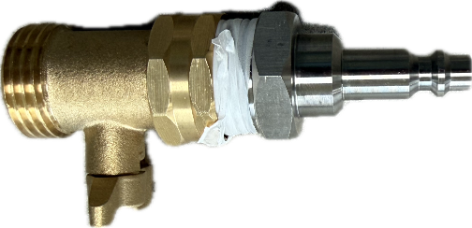
On the right hand side, it plugs into the air hose to bring air from the RV.
On the left hand side, it has a garden hose fitting just like our fresh water system.
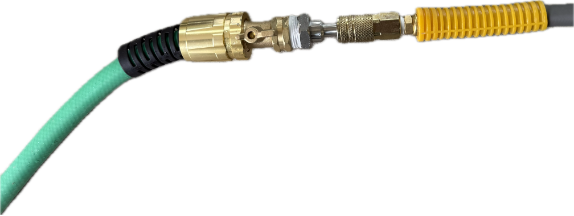
All you have to do is remove the camp's water supply hose from the fresh water tank and hook it up to the RV's air supply. Now the whole camp has air on tap instead of water!
Run Each Tap Until It's Empty
Go to each tap in turn and open it all the way. At first a lot of water will come out, but eventually it will just start spitting air. That's how you know the water has been cleared from that line. Close the faucet and move onto the next one.
Remember:
- Every faucet in the food fort, hot and cold
- The canteen filler
- Both sinks, hot and cold
- Both showers
You should work on one faucet at a time to get maximum air pressure.
When you're done, disconnect the air.
Store the winterization valve
Put the valve back in the shower spare parts (blue) box. Put everything else back where you found it, turn off the RV ignition, and give the key back to Jetpack.